

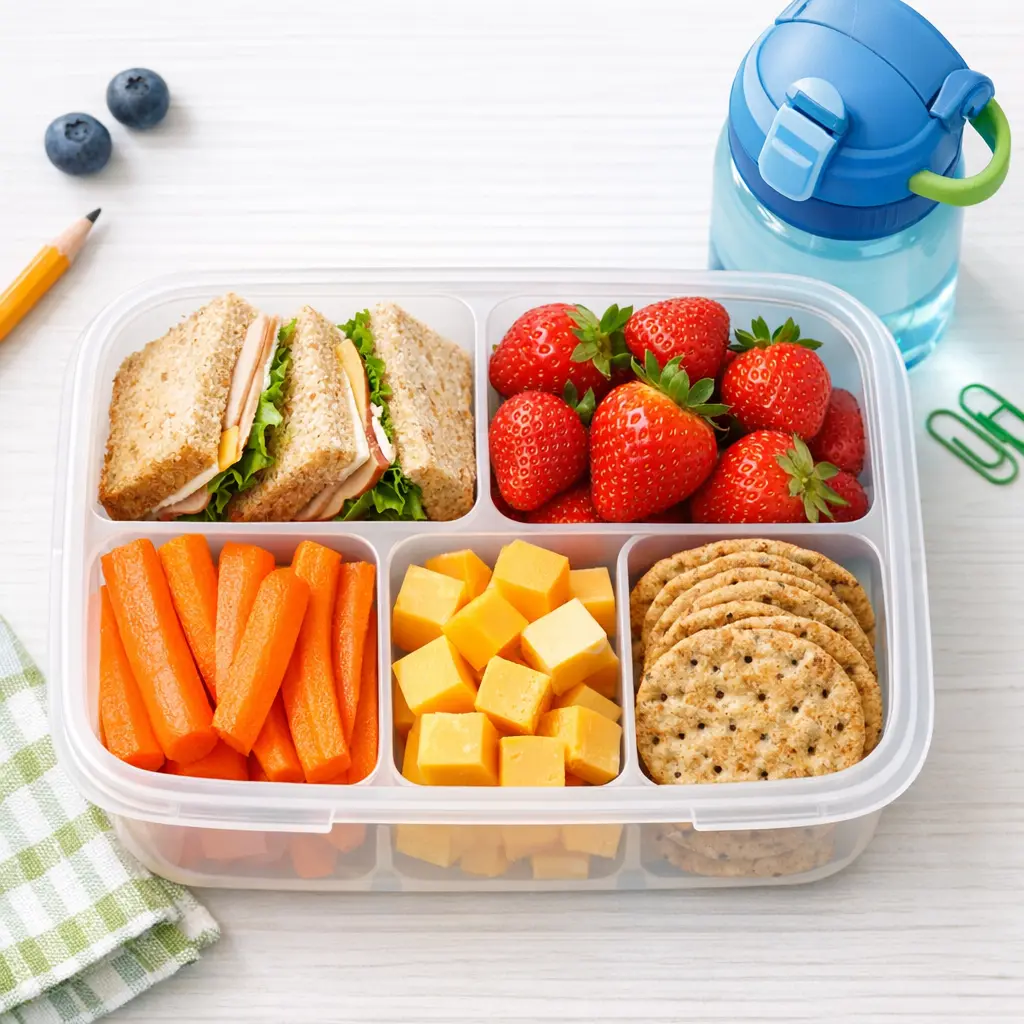
Packing school lunch shouldn’t feel like a daily puzzle. Whether you’re preparing for your child’s first day of kindergarten or streamlining lunches for a middle schooler, you need a reliable system that balances nutrition, safety, and your child’s actual eating habits.
This guide shows you how to pack school lunch efficiently while meeting nutritional needs and food safety standards. You’ll learn practical strategies for meal prep, container selection, handling picky eaters, and managing common challenges. By the end, you’ll have a repeatable system that reduces morning stress and ensures your child has food they’ll actually eat.
Understanding School Lunch Basics
What Makes a Complete School Lunch
A complete school lunch provides balanced nutrition, stays safe until eaten, and appeals to your child enough that they’ll actually consume it. The lunch sits unrefrigerated for hours, travels in a backpack, and competes with cafeteria options and friends’ lunches.
Your packed lunch must address three critical factors:
Nutrition balance – Provide energy and nutrients for afternoon learning and activities without causing energy crashes or hunger before the school day ends.
Food safety – Maintain safe temperatures for perishable foods from morning packing through midday consumption, typically four to five hours later.
Actual appeal – Include foods your child recognizes, enjoys, and can eat independently within their lunch period, usually 20-30 minutes with distractions.
How Lunch Timing Affects Your Packing
Most children eat lunch four to five hours after you pack it. Elementary students often have lunch between 11:00 AM and 12:30 PM. Middle and high school schedules vary more widely, with some students eating as late as 1:30 PM.
This timing creates specific challenges:
Foods packed at 7:00 AM must remain safe and appetizing until noon or later. Perishable items enter the temperature danger zone (40°F-140°F) without proper cooling. Fruits brown, sandwiches become soggy, and textures change.
Consider your child’s specific lunch period when selecting foods and packing methods. A student eating at 11:00 AM has different needs than one eating at 1:00 PM.
Common Mistakes That Lead to Uneaten Lunches
Parents often pack lunches that return home barely touched. Understanding why helps you avoid these patterns:
Packing adult preferences instead of child preferences – That quinoa salad might be nutritious, but if your child won’t eat it, it provides zero nutrition.
Overcomplicating foods – Complex dishes with mixed textures or unfamiliar combinations often get rejected, especially by younger children.
Ignoring practical eating constraints – Foods requiring utensils, extensive unwrapping, or neat eating may be skipped during short, social lunch periods.
Portion size mismatches – Too much food overwhelms and leads to waste; too little leaves children hungry and distracted.
Temperature problems – Warm yogurt, melted cheese, or lukewarm thermoses discourage eating.
Essential Supplies and Equipment
Choosing the Right Lunch Box
Your lunch box is the foundation of your packing system. The right choice makes daily packing easier and keeps food safer.
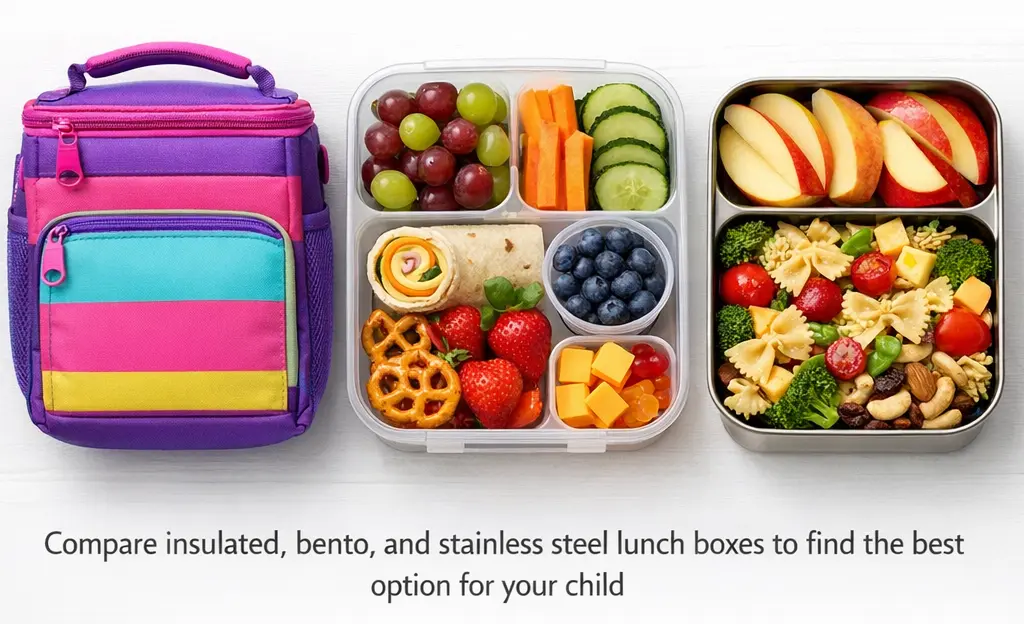
Insulated lunch bags work best for most families. Look for:
- Thick insulation (at least 3-4mm foam)
- Easy-clean interior lining
- Appropriate size (not too large, which wastes ice pack effectiveness)
- Comfortable handle or strap for your child
- Simple design that ages well across school years
Hard-sided lunch boxes offer durability and crush protection but typically provide less insulation. Choose these if your child’s backpack or locker situation crushes soft bags.
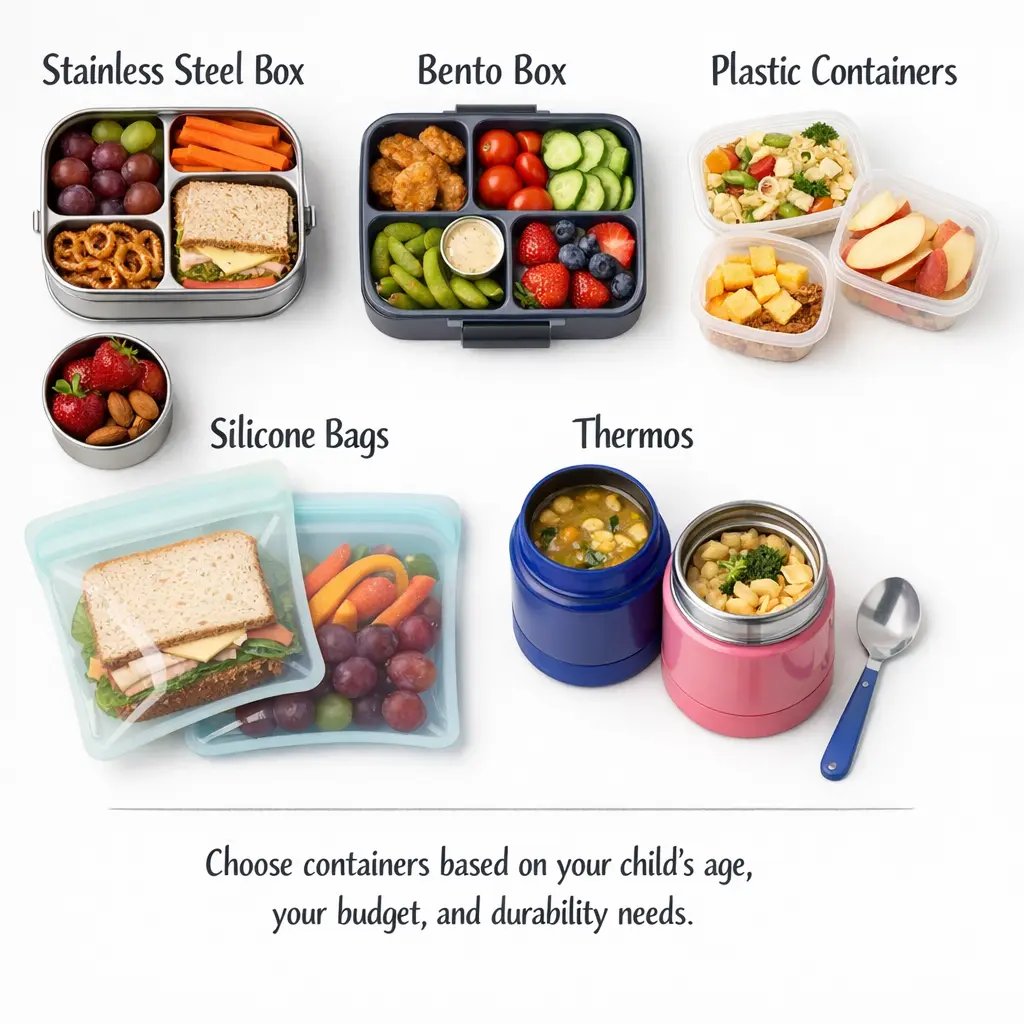
Bento-style boxes integrate the container and carrier. These work well for younger children with simple preferences but limit flexibility as children age and preferences expand.
Avoid trendy character designs for older children. A simple, quality insulated bag lasts multiple school years and doesn’t become embarrassing in middle school.
Food Containers That Actually Work
Invest in quality containers. Poor containers leak, break, and create morning frustration.
For main items:
- Stainless steel or BPA-free plastic containers with secure, leak-proof lids
- Size variety: small (snacks), medium (sides), large (main items)
- Compartmented containers for children who prefer separated foods
- Wide-mouth designs for easy eating and cleaning
For wet foods:
- Small containers with rubber gasket seals for dips, dressings, applesauce
- Reusable pouches for yogurt or smoothies (older children only)
For hot foods:
- Vacuum-insulated food thermoses (keeps food hot 4-6 hours)
- Wide-mouth design for easy filling and eating
- Appropriate size (8-16 oz for most children)
For drinks:
- Reusable water bottles with secure, leak-proof caps
- Insulated bottles if temperature maintenance matters
- Age-appropriate opening mechanism
Professional tip: Buy duplicates of containers that work well. This allows overnight dishwasher cycles without morning searching and provides backup for lost containers.
Ice Packs and Temperature Control
Food safety depends on keeping cold foods cold. Ice packs are essential, not optional.
Effective ice pack strategies:
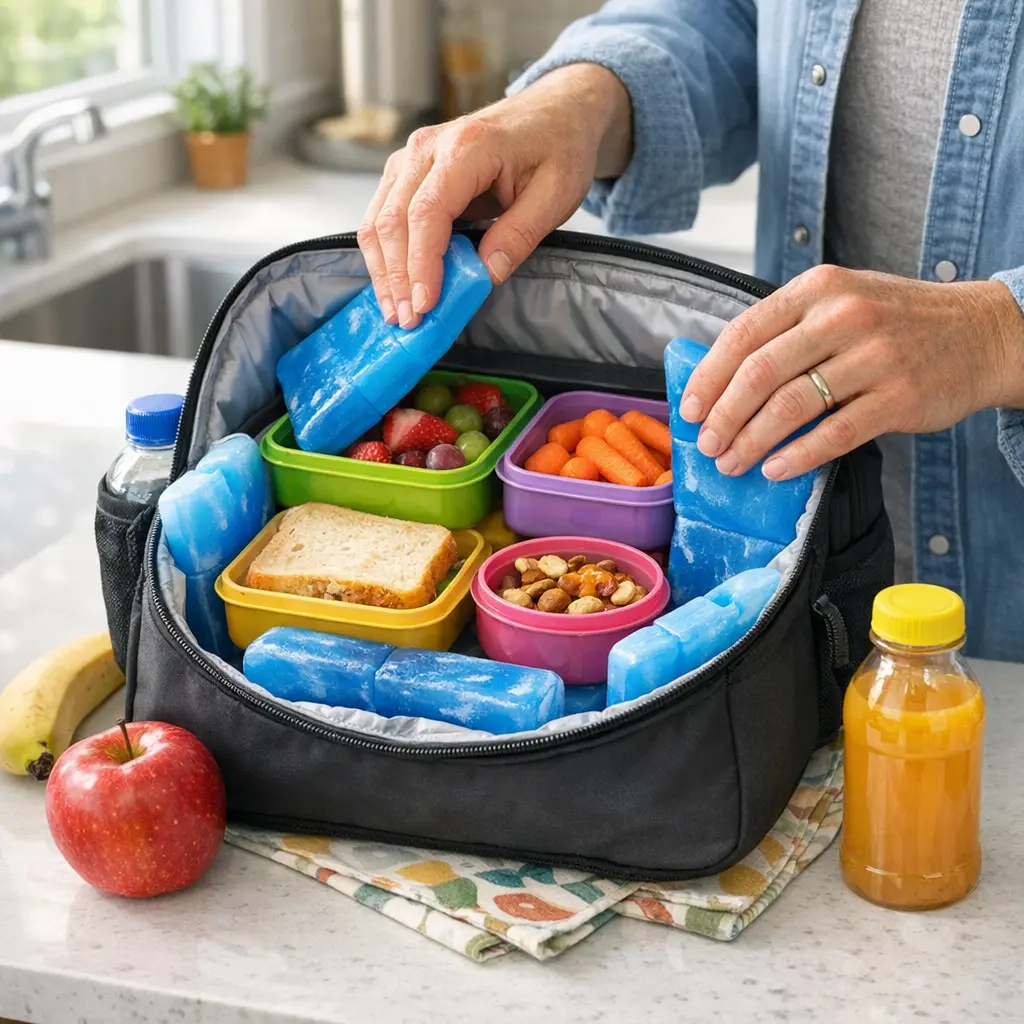
Use at least two ice packs per lunch for perishable foods. Place one on the bottom of the lunch bag and one on top of the food, creating a cold envelope.
Slim, flexible ice packs fit better in lunch bags and conform around containers. Freeze overnight for maximum effectiveness.
Frozen water bottles serve double purpose as ice packs and drinking water. By lunchtime, the water is cold but drinkable. This works well for older children but can be heavy for younger ones.
Frozen juice boxes function similarly to frozen water bottles. The juice thaws to a slushy consistency by lunch.
Common mistake: Using one small ice pack for a lunch bag with meat, dairy, and other perishables. This doesn’t provide adequate cooling for four-plus hours.
Organization and Accessories
Supporting items make packing smoother:
Reusable utensils in a small case prevent plastic waste and ensure your child can eat foods requiring forks or spoons.
Napkins or small towels handle spills and messy foods. Cloth napkins reduce waste.
Small notes or drawings create connection. A simple “Have a great day!” can brighten a difficult school day.
Bag tags with your child’s name prevent lost lunch bags, especially in elementary schools where many children have similar bags.
The Five-Component Balanced Lunch Formula
Building Nutritional Balance
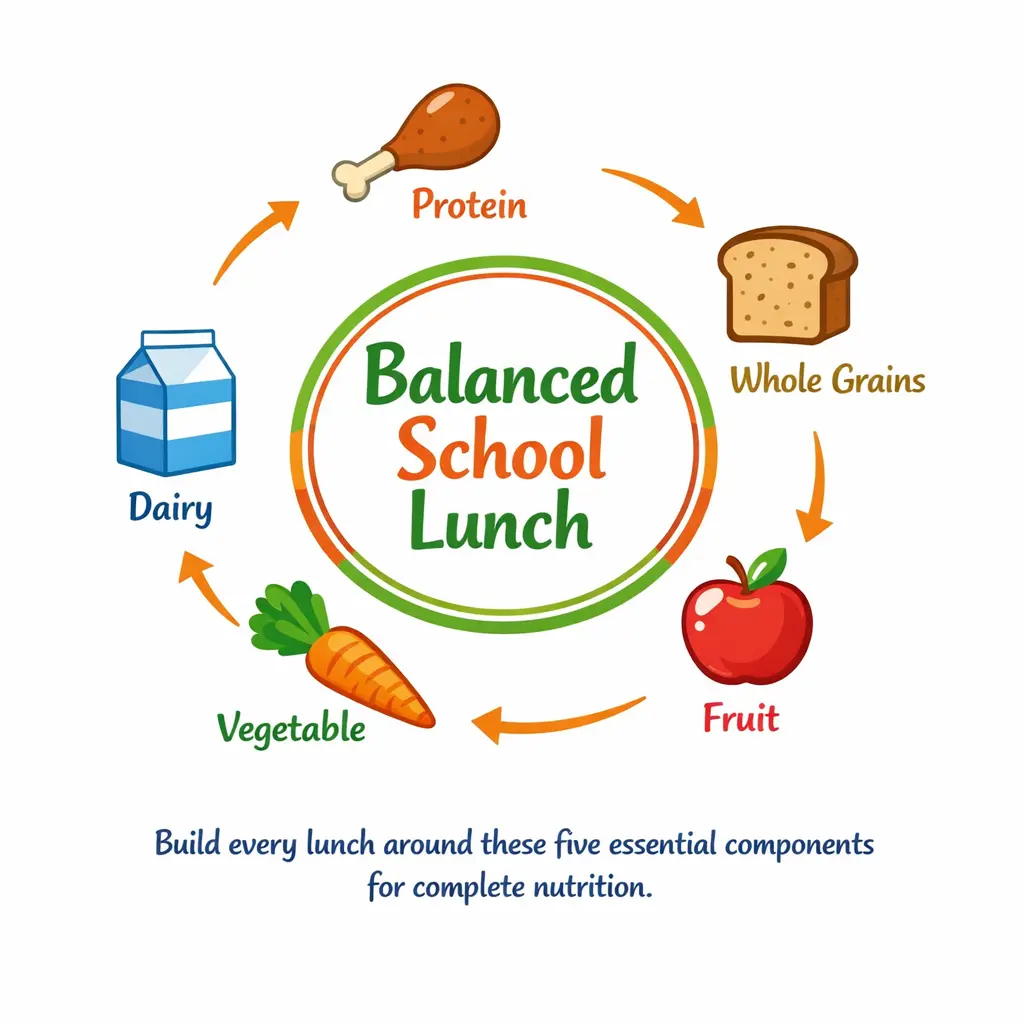
The USDA MyPlate model adapts well to packed lunches. Aim for five components in each lunch:
1. Protein source (20-30% of lunch)
- Meat, poultry, or fish
- Eggs
- Beans or lentils
- Nut or seed butter (if allowed)
- Cheese
- Hummus
- Tofu
2. Whole grain (20-25% of lunch)
- Whole wheat bread
- Whole grain crackers
- Brown rice
- Whole grain pasta
- Oatmeal
- Whole grain tortillas
- Popcorn (plain, for older children)
3. Fruit (15-20% of lunch)
- Fresh whole fruits
- Cut fruit in containers
- Frozen fruit (thaws by lunch)
- Dried fruit (small portions)
- Applesauce or fruit cups (no added sugar)
4. Vegetable (15-20% of lunch)
- Raw vegetables with dip
- Leftover cooked vegetables
- Salads (pack dressing separately)
- Vegetable-based soups in thermoses
5. Dairy or alternative (15-20% of lunch)
- Milk (if school provides cold storage)
- Yogurt
- Cheese
- Fortified non-dairy alternatives (soy milk, almond milk)
Plus: Water or appropriate beverage
This formula provides balanced macronutrients (carbohydrates, protein, fat) and essential vitamins and minerals for sustained energy and concentration.
Portion Sizes by Age
Children’s nutritional needs vary by age, activity level, and individual growth patterns. These ranges provide starting points:
Elementary school (ages 5-10):
- Protein: 2-3 oz
- Grain: 1-2 servings
- Fruit: 1 cup
- Vegetable: ½-1 cup
- Dairy: 1 cup
Middle school (ages 11-13):
- Protein: 3-4 oz
- Grain: 2-3 servings
- Fruit: 1-1.5 cups
- Vegetable: 1-1.5 cups
- Dairy: 1 cup
High school (ages 14-18):
- Protein: 4-5 oz
- Grain: 2-3 servings
- Fruit: 1.5-2 cups
- Vegetable: 1.5-2 cups
- Dairy: 1 cup
Adjust based on your child’s appetite, growth stage, and whether they eat breakfast and after-school snacks. Active children involved in sports need larger portions.
The “1 Love, 1 Like, 1 Learning” Approach
This strategy balances nutrition with actual eating:
1 Love – Include one food your child genuinely loves. This ensures they eat something and makes the lunch appealing.
1 Like – Add a food your child likes but doesn’t request daily. This provides variety without resistance.
1 Learning – Include one new food, different preparation, or less-preferred healthy option. This expands their palate without creating a lunch they’ll reject entirely.
Example lunch using this approach:
- Love: Cheese cubes (favorite protein)
- Like: Apple slices with peanut butter
- Learning: Cucumber slices with ranch (new vegetable presentation)
- Plus: Whole grain crackers and water
This method prevents both the “all favorites, no nutrition” approach and the “all healthy foods they won’t eat” approach.
Food Safety for Packed Lunches
Understanding the Temperature Danger Zone
Bacteria multiply rapidly between 40°F and 140°F. This “danger zone” means perishable foods left at room temperature become unsafe within two hours.
Packed lunches face this challenge directly. Without refrigeration, perishable foods warm to room temperature, creating food safety risks.
High-risk foods requiring cold packs:
- Meat, poultry, fish
- Dairy products (cheese, yogurt, milk)
- Eggs and egg-based foods
- Mayonnaise-based salads
- Cut fruits and vegetables (lower risk but best kept cold)
Shelf-stable foods safe without cooling:
- Whole fresh fruits with peel
- Vegetables (whole carrots, celery)
- Bread and baked goods
- Crackers and dry cereals
- Nuts and seeds
- Dried fruits
- Unopened shelf-stable milk boxes or juice boxes
Keeping Cold Foods Cold
To maintain food safety for four to five hours:
Essential cold lunch strategies:
Use adequate ice packs – Two to three ice packs for lunches with perishable foods. One ice pack isn’t sufficient.
Pre-chill containers – Fill thermoses with ice water while preparing lunch. Dump ice water, then add cold food. This keeps food colder longer.
Freeze appropriate items – Freeze juice boxes, water bottles, or even sandwiches (certain types). They thaw by lunchtime while keeping surrounding foods cold.
Pack frozen foods – Frozen grapes, frozen yogurt tubes, or frozen applesauce pouches serve as ice packs and snacks.
Insulate properly – Keep lunch bags closed until lunch. Don’t pack them with warm items or leave them in hot cars.
Consider storage location – Advise your child to store their lunch bag in the coolest available location (not sunny windowsills or hot lockers).
Keeping Hot Foods Hot
Vacuum-insulated thermoses maintain hot food temperatures for four to six hours.
Hot lunch best practices:
Preheat the thermos – Fill with boiling water, let sit several minutes, dump water, then immediately add piping hot food. This dramatically improves heat retention.
Fill completely – Thermoses maintain temperature better when full. Choose appropriate sizes.
Pack saucy foods – Soups, stews, chili, pasta with sauce stay hotter than dry foods. The liquid helps maintain temperature.
Test timing – Check food temperature after the actual time period your child waits before eating. Ensure it’s still appropriately hot.
Safety warning: Very hot foods can burn mouths. For younger children, test that thermoses cool enough to handle safely and food isn’t scalding by lunchtime.
Safe Food Combinations
Some food combinations create higher risks:
Risky: Mayonnaise-based salads at room temperature
Solution: Use ice packs or substitute Greek yogurt-based dressing, which has slightly better safety profile (though still requires cooling).
Risky: Cut melon without adequate cooling
Cut melon grows bacteria quickly. Solution: Use multiple ice packs or choose whole fruits.
Risky: Leftover rice or pasta kept warm (not hot enough)
These foods develop bacteria in the danger zone. Solution: Keep thoroughly hot in preheated thermos or pack cold and your child eats cold.
Step-by-Step Lunch Packing Process
The Night-Before Method
Preparing components the evening before reduces morning stress and decision fatigue.
Night-before tasks (15-20 minutes):
Step 1: Review and decide (3 minutes)
Check school calendar for schedule changes, activities, or special lunch events. Decide tomorrow’s lunch based on preferences, leftovers, and variety rotation.
Step 2: Prepare containers (3 minutes)
Select appropriate containers. Pre-chill any containers for cold foods by placing in refrigerator.
Step 3: Prep non-perishable components (5 minutes)
Pack crackers, whole fruits, unopened applesauce cups, granola bars, or other shelf-stable items directly into lunch box.
Step 4: Prepare perishable components (8 minutes)
- Portion cut vegetables into containers
- Make sandwiches (wrap tightly in plastic wrap or containers)
- Portion yogurt, cheese, or other dairy
- Prepare any salads or sides
- Store all perishable items in refrigerator
Step 5: Set up morning station (1 minute)
Place lunch bag, ice packs (in freezer), and refrigerated components where you’ll assemble in morning. Leave note if child packs own lunch.
The Morning Assembly System
Morning assembly takes five minutes when night prep is complete.
Morning tasks (5 minutes):
Step 1: Grab and pack cold items (2 minutes)
Transfer all refrigerated components from fridge to lunch bag.
Step 2: Add ice packs (1 minute)
Place frozen ice packs on bottom and top of perishable items, creating cold envelope.
Step 3: Add drink (1 minute)
Fill water bottle or add frozen juice box/milk.
Step 4: Final additions (1 minute)
Add any last-minute items (fresh fruit, note, napkin, utensils).
Step 5: Check and close (30 seconds)
Quick visual check of balance and contents. Zip or close lunch bag.
The Full-Morning Method
If night prep isn’t possible, efficient morning packing takes 10-15 minutes.
Create an assembly line approach:
Station 1: Main component
Prepare protein item (make sandwich, portion leftovers, add deli meat and cheese to container).
Station 2: Sides and additions
Wash and portion fruits and vegetables. Add to containers.
Station 3: Finishing
Add dairy, grains, drink, and extras.
Station 4: Temperature control
Add ice packs or preheat thermos and fill with hot food.
Station 5: Pack and seal
Arrange items in lunch bag, close, and place where child will grab it.
This system prevents scattered movement around the kitchen and reduces forgotten items.
Involving Your Child
Age-appropriate participation builds skills and increases lunch acceptance.
Ages 5-7:
- Choose between two lunch options you’ve selected
- Wash fruits and vegetables
- Place items in lunch bag
- Draw pictures or write notes
Ages 8-10:
- Select from approved lunch component lists
- Prepare simple items (spread peanut butter, pack crackers)
- Pack non-perishable items
- Learn to check balance
Ages 11-13:
- Plan full lunches with guidance
- Prepare most components independently
- Understand and apply food safety
- Pack complete lunches with spot-checks
Ages 14-18:
- Full independence with lunch planning and packing
- Manage grocery list additions
- Prepare batches for entire week
- Handle special dietary needs
Night-Before Meal Prep Strategies
Weekly Batch Preparation
Dedicating one hour on weekends or evenings creates lunch components for entire week.
Effective batch prep items:
Proteins:
- Hard-boil a dozen eggs (last 5-7 days refrigerated)
- Grill or bake chicken breast, slice for sandwiches or salads
- Prepare egg salad or tuna salad (3-4 days refrigerated)
- Cook ground beef or turkey for various uses
- Bake meatballs
Grains:
- Bake whole grain muffins or bread
- Prepare rice or quinoa batches
- Make pasta salad (without mayonnaise dressing)
Vegetables:
- Wash and cut carrot sticks, celery, bell peppers (3-4 days fresh)
- Prepare hummus or vegetable dips
- Roast vegetables for thermoses or wraps
Fruits:
- Wash grapes, berries, and other fruits
- Portion fruit cups
- Make applesauce
Assembly items:
- Portion crackers into reusable bags
- Create snack packs (cheese cubes, nuts if allowed)
- Prepare dressing or dip containers
Container Prep Systems
Organizing by day reduces morning decisions.
Method 1: Daily container sets
Assign five containers per lunch day. Pack all non-perishable items Sunday evening. Each morning, add perishables and ice packs to that day’s set.
Method 2: Component stations
Create refrigerator “zones” for lunch components:
- Protein zone: Prepped meats, eggs, cheese
- Produce zone: Cut vegetables, fruit containers
- Grain zone: Bread, crackers, baked goods
- Dairy zone: Yogurt, milk alternatives
- Extras zone: Dips, dressings, treats
Each morning, take one item from each zone.
Method 3: Full meal prep
Prepare complete lunches Sunday evening, refrigerate in lunch bags (without ice packs). Each morning, add ice packs and drinks. This works for Monday-Wednesday lunches. Prepare mid-week for Thursday-Friday to maintain freshness.
Make-Ahead Sandwiches
Sandwiches are lunch staples, but proper preparation prevents sogginess.
Sandwiches that freeze well:
- Peanut butter and jelly (no fresh fruit added)
- Deli meat and cheese (no vegetables, condiments)
- Cooked meat (chicken, turkey, roast beef) without vegetables
Freezing method:
Make sandwiches, wrap individually in plastic wrap, then place in freezer bag. Label with date. Freeze up to one month. Pack frozen; they thaw by lunchtime while keeping lunch cold.
Sandwiches that don’t freeze well:
- Anything with mayonnaise, mustard, or wet condiments
- Fresh vegetables (lettuce, tomato, cucumber)
- Egg-based fillings
Preventing soggy fresh sandwiches:
- Place lettuce or cheese slices as barriers between bread and wet ingredients
- Pack condiments separately for child to add
- Use dense breads (bagels, wraps) rather than soft sandwich bread
- Toast bread lightly before making sandwich
Morning Assembly Systems
The 5-Minute Lunch Pack
When time is limited, this system delivers complete lunches quickly.
Essential approach: Simplify don’t skip
5-minute lunch template:
- Protein: Pre-portioned option (string cheese, hard-boiled egg, deli meat roll-up) – 1 minute
- Grain: Grab and go (crackers, granola bar, whole grain muffin) – 30 seconds
- Fruit: Whole fruit requiring no prep (apple, banana, orange) – 30 seconds
- Vegetable: Pre-cut from batch prep or baby carrots with ranch cup – 1 minute
- Drink: Fill water bottle – 1 minute
- Assembly: Pack with ice packs – 1 minute
Total: 5 minutes
This template requires batch prep or strategic grocery shopping but executes quickly each morning.
The Leftovers System
Dinner leftovers become easy lunches with planning.
Making leftovers work:
Cook with lunch in mind – When preparing dinner, make extra portions specifically for lunches.
Choose lunch-friendly recipes – Pasta dishes, casseroles, stir-fries, soups, and grain bowls work better than foods requiring elaborate plating.
Portion immediately – After dinner, portion lunch servings directly into lunch containers before refrigerating. This prevents morning searching and ensures appropriate portions.
Consider presentation – Some children resist eating “dinner food” for lunch. Rename or present differently (yesterday’s taco filling becomes “burrito bowl”).
Temperature planning – Decide whether leftover will be eaten cold or packed hot in thermos. Pre-heat thermoses for hot leftovers.
Safety timing – Use refrigerated leftovers within 3-4 days.
Age-Specific Packing Approaches
Elementary School (Ages 5-10)
Younger children need simpler foods, smaller portions, and easier-to-manage containers.
Packing considerations:
Simple, recognizable foods – Stick with familiar items. Lunch period isn’t the time for adventurous eating with young children.
Easy-open containers – Practice opening containers at home. If your child can’t open it independently, pack differently.
Finger foods preferred – Foods requiring minimal utensils get eaten more reliably. Cut sandwiches in quarters. Include foods eaten with hands.
Visual appeal – Color variety and fun presentations (cookie cutters for sandwiches, colorful toothpicks) increase interest.
Smaller portions, more variety – Pack several small items rather than large portions of fewer items.
Backup familiar items – Always include at least one or two foods you know your child will eat. School lunch shouldn’t be a hunger battle.
Common elementary issues:
Trading and sharing – Young children trade lunches. Pack only foods you’re comfortable being shared. Check school policies on sharing.
Time management – Young children talk more than eat. Pack foods eaten quickly. Avoid items requiring extensive unwrapping or complicated eating.
Lost containers – Expect lost containers and lids. Don’t pack your finest containers. Label everything.
Middle School (Ages 11-13)
Middle schoolers balance growing independence with social awareness.
Packing considerations:
Larger portions – Growth spurts demand more food. Pack generous portions or multiple snacks.
Social acceptability – Middle schoolers become aware of “cool” and “uncool” foods. Talk with your child about preferences in social context.
Independence increasing – Involve them in planning and packing. This age should begin managing their own lunches with oversight.
Varied schedules – Activities, clubs, and sports mean some days need larger or different lunches.
Grazing preference – Many middle schoolers prefer multiple snacks throughout the day rather than one large lunch. Pack accordingly if school rules allow.
Common middle school issues:
Skipping lunch – Social stress or time constraints lead some students to skip lunch. Monitor and address. Consider portable, quick options.
Cafeteria competition – Packed lunches compete with cafeteria options. Make packed lunches appealing or consider hybrid approaches (some days packed, some cafeteria).
Appearance concerns – Some students reject “babyish” lunch boxes or childish foods. Update supplies to match maturity.
High School (Ages 14-18)
High schoolers should manage their own lunches with support.
Packing considerations:
Full independence – Teens should plan, shop for, and pack their own lunches with family support and grocery budget.
Substantial nutrition – Growing teens, especially athletes, need significant calories and protein. Pack large portions or multiple meals if long school days.
Convenience focus – Teens prioritize convenience. Stock easy-assembly options.
Social flexibility – Teens may eat off campus, skip lunch, or eat with friends. Packed lunches need flexibility.
Special diets – Teens exploring vegetarianism, veganism, or specific eating styles need support and education for balanced nutrition.
Common high school issues:
Skipping breakfast and lunch – Some teens skip meals. This affects concentration and mood. Address underlying causes (time, social stress, body image concerns).
Expensive taste – Teens may want cafeteria or restaurant food. Discuss budgets and compromise.
Late schedules – Some high schoolers have very late lunch periods (1:00-2:00 PM). Extra snacks or larger breakfast becomes important.
Solutions for Picky Eaters
Understanding Picky Eating
Picky eating exists on a spectrum from mild preferences to severe restrictive eating. Most children fall in the mild to moderate range.
Normal picky eating includes:
- Preferring familiar foods
- Rejecting new foods initially
- Going through phases of food preferences
- Sensitivity to textures or temperatures
- Preference for separated vs. mixed foods
When to seek professional help:
- Very limited food variety (fewer than 10-15 accepted foods)
- Nutritional deficiencies
- Lack of whole food groups
- Extreme distress around new foods
- Choking, gagging, or vomiting with certain textures
For typical picky eating, lunch strategies exist that ensure nutrition without battles.
Strategies That Work
Strategy 1: The Division of Responsibility
You decide what foods are offered and when. Your child decides whether and how much to eat from what’s offered.
Apply this to lunch: Pack balanced options. Don’t force eating or punish uneaten items. Monitor overall nutrition across days, not individual meals.
Strategy 2: Safe foods plus exposure
Always include “safe foods” your child accepts. Add one less-preferred item for exposure without pressure.
Example: If your child only eats peanut butter sandwiches, pack the sandwich plus apple slices (may not eat) and crackers (safe backup). Over time, exposure increases acceptance.
Strategy 3: Food chaining
Gradually connect new foods to accepted foods through small changes.
Example chain:
- Accepts: Chicken nuggets
- Try: Homemade breaded chicken tenders (similar)
- Then: Grilled chicken strips (remove breading gradually)
- Then: Different chicken preparations
Strategy 4: Deconstructed meals
Pack sandwich components separately. Child assembles or eats separately. This works for children who reject mixed foods.
Strategy 5: Preferred presentations
Some children accept foods only in specific forms:
- Raw vegetables but not cooked
- Cheese cubes but not sliced cheese
- Apples sliced but not whole
Honor these preferences. The nutrition is identical.
Foods Almost All Children Accept
When struggling with lunch ideas, these foods have broad acceptance:
Proteins:
- String cheese
- Cheese cubes
- Pepperoni or salami slices
- Hard-boiled eggs
- Peanut butter or sunflower seed butter (if allowed)
- Plain deli turkey or ham
Grains:
- Crackers (various types)
- Bread (plain or as sandwich)
- Pretzels
- Plain pasta (buttered or with simple sauce)
Fruits:
- Grapes
- Apple slices
- Berries
- Bananas
- Applesauce
Vegetables (more challenging, but these have higher acceptance):
- Baby carrots
- Cucumber slices
- Bell pepper strips
- Cherry tomatoes
- Corn
Combination foods:
- Quesadillas
- Pizza (homemade or leftovers)
- Pasta with butter or simple sauce
Dietary Restrictions and Allergies
Navigating Nut-Free Policies
Many schools ban nuts due to severe allergy risks. This eliminates peanut butter, a lunch staple.
Nut-free protein alternatives:
Sunflower seed butter or soy nut butter – Similar taste and texture to peanut butter. Works in sandwiches, with crackers, or as dips.
Hummus – Protein-rich bean spread. Use like nut butter with crackers, vegetables, or in wraps.
Cream cheese – Plain or flavored. Spread on bagels, crackers, or tortillas.
Deli meat and cheese – Traditional sandwich fillings.
Yogurt – Protein-rich dairy option.
Beans – Black bean salads, refried beans in quesadillas, or white bean dip.
Eggs – Hard-boiled, egg salad, or leftover frittatas.
Check all labels – Many processed foods contain nuts or “may contain nuts” warnings. Read carefully.
Gluten-Free Lunches
Celiac disease or gluten sensitivity requires eliminating wheat, barley, and rye.
Gluten-free lunch strategies:
Use naturally gluten-free foods:
- Fruits and vegetables (all)
- Meat, poultry, fish (plain, not breaded)
- Eggs
- Dairy
- Rice, quinoa, certified gluten-free oats
- Beans and legumes
- Nuts and seeds (if allowed at school)
Gluten-free packaged options:
- Gluten-free bread, wraps, or crackers
- Rice cakes
- Corn tortillas
- Gluten-free pretzels or chips
Cross-contamination awareness:
- Use separate spreaders and containers if household includes gluten
- Check labels on processed foods
- Avoid school lunch programs unless certified gluten-free options available
Easy gluten-free lunches:
- Rice bowl with chicken and vegetables
- Corn tortilla quesadilla
- Salad with protein and gluten-free crackers
- Yogurt with fruit and gluten-free granola
- Gluten-free sandwich with favorite fillings
Dairy-Free and Vegan Options
Dairy allergies or vegan diets require eliminating dairy and possibly other animal products.
Dairy-free protein sources:
- Meat, poultry, fish (for non-vegan)
- Beans and legumes
- Tofu or tempeh
- Nut or seed butters (if allowed)
- Hummus
- Dairy-free yogurt (soy, coconut, almond-based)
Calcium sources without dairy:
- Fortified non-dairy milk
- Fortified orange juice
- Leafy greens (kale, collards)
- Fortified cereals
- Beans
- Tahini
Vegan lunch ideas:
- Hummus and vegetable wrap
- Peanut butter and jelly sandwich (check bread ingredients)
- Bean burrito bowl
- Pasta salad with vegetables and beans
- Tofu stir-fry in thermos
Label reading: Many processed foods contain hidden dairy (whey, casein, milk solids). Read all labels carefully.
Budget-Friendly Lunch Strategies
Cost Comparison: Packed vs. Cafeteria
Packed lunches typically cost less than cafeteria lunches or pre-packaged convenience options.
Average costs:
- Cafeteria lunch: $3-5 per day ($15-25 per week)
- Packed lunch with purchased convenience items: $3-4 per day ($15-20 per week)
- Packed lunch with home-prepared foods: $1.50-2.50 per day ($7.50-12.50 per week)
Savings: $100-$200+ per school year per child with strategic home packing.
Shopping Strategies for Budget Lunches
Buy in bulk:
- Large containers of yogurt (portion into reusable containers)
- Block cheese (slice or cube yourself)
- Whole fruits when in season
- Large bags of carrots, celery
- Big boxes of crackers
- Economy packs of whole grain bread
Strategic store brands:
- Crackers, bread, pasta, and canned fruits are comparable quality in store brands
- Dairy products (cheese, yogurt) often identical to name brands
- Produce is produce regardless of brand
Seasonal and sale shopping:
- Buy fruits and vegetables in season for better prices and flavor
- Stock up on shelf-stable items during sales
- Freeze bread and baked goods purchased on sale
Avoid individual packaging:
Pre-portioned, individually wrapped items cost significantly more. Buy large quantities and portion into reusable containers.
Cost example:
- Individual yogurt cups: $0.75-1.00 each
- Large yogurt tub portioned: $0.30-0.40 per serving
Savings: $0.40-0.60 per serving
Budget-Friendly Lunch Components
Inexpensive proteins:
- Eggs (one of the cheapest complete proteins)
- Canned tuna or chicken
- Dried beans and lentils
- Peanut or sunflower seed butter
- Block cheese cubed or sliced
Affordable grains:
- Store-brand whole wheat bread
- Bulk crackers
- Homemade muffins or bread
- Pasta
- Rice
- Oatmeal
Budget fruits and vegetables:
- Bananas (year-round cheap option)
- Apples (especially in fall)
- Oranges (winter months)
- Carrots
- Celery
- Cabbage
- Seasonal produce
Money-saving lunch ideas:
- Pasta salad (pasta, vegetables, simple dressing)
- Bean and cheese quesadilla
- Egg salad sandwich
- Homemade soup in thermos
- Rice bowl with egg and frozen vegetables
Reducing Waste and Sustainability
Transitioning to Reusable Containers
Single-use plastic bags, disposable containers, and individual packaging create significant waste.
Reusable system essentials:
Initial investment:
- Quality lunch box or bag
- Set of varied-size containers with lids
- Reusable utensils
- Cloth napkins
- Reusable snack bags or silicone bags
- Water bottle
Cost: $40-80 for complete setup per child
Break-even: Reusable systems pay for themselves within one semester compared to disposable packaging costs.
Maintaining reusables:
- Establish evening dishwasher routine
- Buy duplicates of most-used containers
- Replace lost items individually rather than full replacement
- Teach children responsibility for returning containers
Reducing Food Waste
Uneaten lunches waste money and food.
Strategies to reduce waste:
Monitor what returns uneaten – If the same items consistently come home, stop packing them. Your child won’t suddenly start eating disliked foods.
Adjust portions – Too-large portions lead to waste. Start smaller and increase if child reports hunger.
Repurpose uneaten non-perishables – Unopened crackers, whole fruits, or sealed items go back into pantry or next day’s lunch.
Use leftovers at home – Returned vegetables, fruits, or grains get eaten as after-school snacks or incorporated into dinner (if safe and appropriate).
Involve children in planning – Children eat lunches they helped plan.
Compost when possible – Food scraps and waste can be composted rather than trashed.
Sustainable Food Choices
Reducing packaging:
- Buy bulk and portion yourself
- Choose fruits and vegetables without plastic packaging
- Make homemade baked goods instead of individually wrapped snacks
- Use reusable pouches for applesauce, yogurt
Sourcing considerations:
- Local produce when available and affordable
- Seasonal fruits and vegetables
- Sustainable protein choices
- Reducing meat frequency (beans and plant proteins are more sustainable)
Balance sustainability and practicality:
Perfect sustainability isn’t realistic for busy families. Small consistent changes create impact. Start with one change (switching to reusable bags), then add more as habits form.
Troubleshooting Common Problems
“My Child Won’t Eat Lunch”
When lunches consistently return uneaten, investigate:
Possible causes:
Timing issues – Some children eat large breakfasts and aren’t hungry at lunch. Others have very late lunch periods and need substantial morning snacks.
Social distractions – Talking with friends takes priority over eating, especially for younger children.
Food dislikes – You’re packing foods your child doesn’t actually like (even if they eat them at home).
Anxiety or stress – School stress, social problems, or anxiety can suppress appetite.
Sensory issues – Temperature, texture, or appearance changes during storage make foods unappetizing.
Solutions:
Talk with your child – Ask specific questions: “Was lunch too big? Did you have enough time? Was something wrong with the food?”
Observe patterns – What items get eaten? What gets rejected? Adjust accordingly.
Simplify – Overwhelmingly large or complicated lunches get abandoned. Try fewer, simpler items.
Check timing – Ensure breakfast isn’t too large and too close to lunch. Or provide substantial snacks if lunch is very late.
Visit school – If possible, eat lunch with your child to observe dynamics and environment.
Consult teacher – Teachers observe lunch periods and can provide insight.
“Lunch Comes Home Warm”
Food safety concerns arise when perishable lunches return warm.
Solutions:
Add more ice packs – Two to three ice packs, not just one.
Use better insulation – Upgrade to higher-quality insulated lunch bag.
Freeze items – Pack frozen water bottles, juice boxes, or even frozen grapes as additional cooling.
Pre-chill everything – Refrigerate lunch bag, containers, and all components overnight.
Check storage location – Is your child leaving lunch bag in hot locker or sunny location? Advise coolest possible storage.
Consider hot lunch alternative – If cold chain is impossible to maintain, switch to thermos-based hot lunches or cafeteria.
Time management – If lunch period is very late (1:00 PM or later), maintaining food safety for 6+ hours is challenging. Consider additional ice packs or different foods.
“My Child Trades/Shares Everything”
Lunch trading is common, especially in elementary school.
Concerns:
- Allergy safety
- Nutritional balance
- Your child not eating adequate lunch
Solutions:
Discuss reasons – Is your child trading because they dislike their lunch or because trading is social fun?
Pack only “safe to share” items – If your child will trade no matter what, pack foods that are safe if shared (no allergens, appropriate portions).
Talk about allergies – Educate your child about why sharing certain foods is dangerous for classmates with allergies.
Check school policies – Many schools ban sharing or trading. Remind your child of rules.
Provide trade-worthy extras – If trading is social bonding, pack extra crackers or fruit specifically for sharing, ensuring your child still has complete lunch.
Monitor nutrition – If trading results in inadequate eating, address directly with child and possibly teacher.
Seasonal and Weather Considerations
Hot Weather Strategies
Warm months create additional food safety and appeal challenges.
Hot weather solutions:
Extra ice packs – Use three to four ice packs instead of two in hot weather.
Frozen components – Freeze more items (water bottles, juice boxes, grapes, yogurt tubes).
Avoid heat-sensitive foods – Skip chocolate, soft cheeses that melt, or foods that spoil quickly when warm.
Choose refreshing options – Pack crisp vegetables, cold fruits, and light proteins rather than heavy, warm options.
Insulated bags critical – Don’t skip insulated lunch bag in hot weather.
Storage awareness – Hot cars, outdoor backpack storage, or sun-exposed areas drastically reduce food safety. Discuss storage with your child.
Cold Weather Strategies
Winter allows more flexibility but creates desire for warm, comforting foods.
Cold weather solutions:
Hot lunches in thermoses – Soups, stews, chili, pasta, mac and cheese stay hot and provide comfort.
Warm breakfasts – If lunch will be cold, provide substantial warm breakfast (oatmeal, eggs, etc.).
Room temperature options – Many foods don’t require heating or cooling in winter months, expanding options.
Comfort foods – Pack hearty, filling options (whole grain muffins, dense breads, substantial proteins).
Less ice pack dependency – In cold weather, fewer ice packs needed (though still use for perishables).
Back-to-School Transition
The first weeks of school require adjustment.
Transition strategies:
Start simple – Begin with favorite, familiar foods while child adjusts to new routines.
Overpack slightly – Until you learn child’s actual appetite at school, pack slightly more to prevent hunger.
Check daily – Monitor what’s eaten the first two weeks and adjust quickly.
Practice routines – Start packing lunches the week before school starts to establish habits.
Involve child – Discuss preferences and gather input before school begins.
Prepare supplies early – Don’t wait until the night before school to discover you need new lunch boxes or containers.
Building Variety and Preventing Boredom
Rotation Systems
Variety prevents boredom without requiring creative genius daily.
Weekly rotation approach:
Assign themes to weekdays:
- Monday: Sandwich week (rotate types)
- Tuesday: Thermos hot lunch
- Wednesday: Bento/snack lunch
- Thursday: Wrap or quesadilla
- Friday: Leftover lunch or favorite choice
Within each theme, rotate specifics. “Sandwich Monday” might be:
- Week 1: Turkey and cheese
- Week 2: Ham and cheese
- Week 3: Peanut butter and jelly
- Week 4: Tuna salad
Monthly rotation:
Create a four-week lunch calendar with different lunch ideas. Repeat the calendar, making small substitutions for variety.
Seasonal rotation:
Change lunch patterns with seasons:
- Fall: Warm soups, apples, heartier foods
- Winter: Hot thermoses, citrus fruits
- Spring: Lighter salads, fresh vegetables
- Summer (if applicable): Refreshing cold options
Creative Presentations
Small changes in presentation create interest without changing nutrition.
Presentation ideas:
Cookie cutters – Cut sandwiches, cheese slices, or watermelon into fun shapes.
Colorful variety – “Rainbow lunch” with foods of different colors (strawberries, oranges, yellow peppers, cucumbers, blueberries).
Kabobs – Thread cheese cubes, grapes, and sandwich pieces on reusable picks.
Bento-style arrangements – Organize foods in visually appealing compartments.
Themed lunches – Occasional color themes (all orange foods) or holiday themes without extra work.
Notes and drawings – Simple messages or small drawings add personal touch.
Caution: Don’t over-invest in elaborate Pinterest-perfect lunches daily. Most children care more about taste and familiarity than presentation. Save creative presentations for occasional fun, not daily stress.
13) COMPARISON TABLES
Lunch Container Comparison
| Container Type | Best For | Pros | Cons | Price Range |
|---|---|---|---|---|
| Bento boxes | Younger children, picky eaters who want separated foods | Compartments keep foods separate, all-in-one solution, portion control | Limited flexibility, can be bulky, some leak | $15-35 |
| Stainless steel containers | Durability, sustainability focus | Durable, non-toxic, no staining or odors, dishwasher safe | Heavier, more expensive, not microwave safe | $12-30 per container |
| Plastic containers (BPA-free) | Budget-conscious, variety needed | Lightweight, affordable, many sizes, microwave safe (most) | Can stain, retain odors, less durable | $5-15 per set |
| Silicone bags | Snacks, sandwiches, sustainability | Reusable, flexible, dishwasher safe, reduce waste | Not rigid (foods can crush), drying needed | $10-20 for set |
| Glass containers | Home meal prep (not daily school use) | Non-toxic, no staining, see contents | Heavy, breakable, not ideal for children | $15-30 per set |
Lunch Packing Method Comparison
| Method | Time Investment | Best For | Pros | Cons |
|---|---|---|---|---|
| Night-before prep | 15-20 min evening | Working parents, morning rushers | Reduces morning stress, better food choices, ensures completion | Requires planning, one more evening task |
| Morning assembly | 10-15 min morning | People preferring fresh preparation | Fresher sandwiches, flexible based on morning appetite | Morning time pressure, risk of forgetting |
| Weekly meal prep | 60-90 min weekend | Organized planners, multiple children | Maximum efficiency, consistent nutrition, reduced daily decisions | Large time block needed, requires storage space |
| Child-packed | Varies | Older children, teaching independence | Builds life skills, increases lunch acceptance | Requires oversight, may lack balance initially |
| Hybrid (some prep, some fresh) | 10 min evening + 5 min morning | Most families | Balances efficiency and freshness | Requires system to remember what’s prepped |
Ice Pack and Temperature Control Comparison
| Method | Effectiveness | Duration | Pros | Cons |
|---|---|---|---|---|
| Standard ice packs (2-3) | High | 4-5 hours | Reliable, reusable, designed for purpose | Requires freezer space, can be forgotten |
| Frozen water bottles | High | 4-6 hours | Dual purpose (cooling + drinking water) | Heavy for young children, takes time to thaw |
| Frozen juice boxes | Medium-High | 3-4 hours | Dual purpose, kid-appealing | Sugar content, more expensive than water |
| Frozen food items (grapes, yogurt tubes) | Medium | 2-3 hours | Edible ice packs, no extras needed | Limited cooling power, not sufficient alone |
| Insulated lunch bag alone | Low | 1-2 hours | Easy, no frozen components | Insufficient for perishables beyond 2 hours |
14) CHECKLISTS
Weekly Lunch Prep Checklist
Sunday Evening (60 minutes):
- Check school calendar for week ahead
- Review what was eaten/rejected previous week
- Plan lunch menu for 5 days
- Create grocery list for missing items
- Wash and prep all lunch containers
- Place ice packs in freezer
- Batch prep proteins (hard boil eggs, cook chicken, etc.)
- Wash and cut vegetables for week
- Wash fruits
- Bake any homemade items (muffins, bread)
- Portion snacks into reusable containers
- Organize refrigerator lunch zone
- Set up morning assembly station
Each Evening (10 minutes):
- Review next day’s lunch plan
- Prepare any special components
- Pack non-perishable items
- Place refrigerated items in designated zone
- Set out lunch bag and frozen ice packs location
- Note any special needs (early dismissal, field trip, etc.)
Each Morning (5 minutes):
- Add refrigerated components to lunch bag
- Place ice packs around perishables
- Add fresh fruit if not pre-packed
- Fill water bottle
- Add any notes or special items
- Visual check for balance and completeness
- Place lunch bag where child will grab it
Balanced Lunch Quick-Check
Use this checklist to verify lunch completeness:
- Protein source (meat, eggs, dairy, beans, nut butter)
- Whole grain (bread, crackers, pasta, rice)
- Fruit (fresh, frozen, or unsweetened)
- Vegetable (raw, cooked, or soup-based)
- Dairy or alternative (milk, yogurt, cheese, fortified alternative)
- Water or appropriate drink
- At least one food child loves (ensures some eating)
- Appropriate portion sizes for child’s age and appetite
- Food safety addressed (ice packs for perishables OR shelf-stable items)
- Meets school policies (nut-free if required, etc.)
Bonus elements:
- Small treat or fun item
- Note or encouragement
- Napkin
- Utensils (if needed)
New School Year Setup Checklist
Complete before first day of school:
Supplies:
- New or cleaned lunch bag/box (check for wear)
- Adequate containers (minimum 5-10 various sizes)
- All container lids present and sealing properly
- 3-4 ice packs per child
- Water bottle cleaned and working
- Reusable utensils
- Cloth napkins or paper napkin supply
- Reusable snack bags or containers
Information:
- School’s lunch period time(s)
- Allergen policies (nut-free, etc.)
- Lunch storage location (classroom, locker, cafeteria)
- Sharing/trading policies
- Whether refrigeration available
- Microwave access (older students)
Planning:
- Discussed lunch preferences with child
- Created initial meal rotation plan
- Grocery shopped for first two weeks
- Practiced lunch packing routine
- Established where lunch prep happens
- Set up refrigerator lunch zone
- Designated freezer space for ice packs
Skills (for child):
- Can open all containers independently
- Knows to store lunch in appropriate location
- Understands food allergy safety
- Can manage all components within lunch period
- Knows to bring home lunch bag and containers
Troubleshooting Checklist
When lunches return uneaten, investigate:
- Was there enough time to eat?
- Were foods temperature-appropriate (cold foods cold, hot foods hot)?
- Could my child open all containers independently?
- Were portions appropriate (not overwhelming)?
- Did lunch include at least one favorite food?
- Was lunch too complicated or messy to eat in social setting?
- Did my child report being sick or upset?
- Is this a pattern or one-time occurrence?
- Has my child’s appetite or preferences changed?
- Are there social or academic stressors affecting eating?
When food safety is concern:
- Am I using enough ice packs (2-3 minimum)?
- Are ice packs fully frozen each morning?
- Is lunch bag adequately insulated?
- Am I pre-chilling containers and foods?
- Is storage location appropriate (not hot locker or sunny spot)?
- Am I packing appropriate foods for time duration?
- Are hot foods going in pre-heated thermoses?
15) DECISION FRAMEWORKS
Choosing Your Lunch Packing System
Answer these questions to determine best approach:
1. How much time do you have in mornings?
- Less than 5 minutes → Weekly meal prep system
- 5-10 minutes → Night-before prep with morning assembly
- 10-15 minutes → Full morning preparation possible
- Varies daily → Hybrid system with pre-prepped components
2. What’s your planning style?
- Love planning and batch work → Weekly meal prep
- Prefer daily decisions based on mood → Morning assembly
- Need structure but not rigidity → Rotation system with flexibility
- Minimal planning tolerance → Simple template with limited variety
3. How many children are you packing for?
- 1 child → Any system works
- 2-3 children → Night-before prep or weekly meal prep most efficient
- 4+ children → Weekly meal prep essential
4. What are your child’s eating patterns?
- Consistent preferences → Simple rotation works well
- Constantly changing tastes → Flexible daily decision system
- Very picky → Limited rotation with heavy involvement
- Adventurous eater → Creative variety possible
5. What’s your budget priority?
- Very tight → Weekly meal prep with bulk buying and batch cooking
- Moderate → Mix of convenience and homemade
- Flexible → Can use more convenience items and variety
Recommended systems based on answers:
Busy mornings + Multiple children + Tight budget = Weekly batch meal prep
Moderate morning time + Flexible budget + One child = Night-before prep
Good morning time + Planning-averse + Moderate budget = Simple morning assembly with strategic shopping
Container Investment Decision Framework
How much should you invest in containers?
Start-up approach (Year 1):
- Budget option: $30-50 total
- Basic insulated lunch bag: $15-20
- Set of plastic containers: $10-15
- 2-3 ice packs: $5-10
- Basic water bottle: $5-10
- Mid-range option: $60-100 total
- Quality insulated lunch bag: $25-35
- Mix of stainless and plastic containers: $25-40
- 3-4 quality ice packs: $10-15
- Quality water bottle: $10-15
- Premium option: $120-180 total
- High-end insulated lunch system: $40-60
- Stainless steel container set: $40-60
- Bento boxes: $20-35
- Multiple quality ice packs: $15-20
- Insulated water bottle: $15-25
Consider premium investment if:
- Packing for multiple children (durability matters)
- Strong sustainability focus
- Child is rough on belongings (stainless steel more durable)
- Planning to pack lunches for many years
Budget option sufficient if:
- First time packing (testing what works)
- Child might prefer cafeteria after trying
- Unclear on long-term system
- Tight budget or multiple competing expenses
Replace and upgrade:
Start budget, then upgrade specific components as you identify what works and what frustrates you.
Food Safety Decision Tree
Is this food safe to pack?
Step 1: Is the food perishable?
- No (crackers, whole fruits, shelf-stable items) → Safe to pack without ice packs
- Yes → Go to Step 2
Step 2: How long until your child eats lunch?
- Less than 2 hours → Safe with minimal cooling
- 2-4 hours → Needs adequate ice packs (2+)
- 4-6 hours → Needs multiple ice packs (3-4) and insulated bag
- More than 6 hours → Consider hot thermos option or shelf-stable lunch
Step 3: Can you maintain proper temperature?
- Yes (adequate ice packs, insulated bag, proper storage) → Safe to pack
- No → Choose different food or different preparation
Step 4: Special considerations?
- Cut melon, cooked rice, or other high-risk foods → Extra caution, more cooling
- Very hot weather → Additional ice packs or avoid highly perishable
- Child stores lunch in hot locker → Consider different foods or storage solution
When in doubt: Choose safer alternatives or use thermoses for hot foods that stay above danger zone.
Packing a nutritious school lun
16) FAQS
1. How do I keep school lunch cold without a refrigerator?
Use an insulated lunch bag with at least two to three ice packs to maintain safe temperatures for four to five hours. Place one ice pack on the bottom of the bag and one on top of the food, creating a cold envelope around perishable items. For additional cooling, freeze water bottles or juice boxes to serve as extra ice packs. Pre-chill all containers and food in the refrigerator before packing. Ensure your child stores the lunch bag in the coolest available location, away from direct sunlight or heat sources like radiators.
2. What should I pack for a picky eater who refuses most foods?
Always include at least one or two “safe foods” your child reliably eats to ensure they consume adequate calories. Add one less-preferred food for exposure without pressure—don’t force eating it. Use the food chaining technique by connecting new foods to accepted ones through small changes. For example, if your child eats cheese cubes, try different cheese types gradually. Pack deconstructed meals with components separated so your child can eat preferred parts. Involve your child in lunch planning and shopping to increase acceptance. Monitor overall nutrition across several days rather than demanding balance in each individual lunch.
3. How far in advance can I prepare school lunches?
Prepare components two to three days in advance for maximum freshness while maintaining convenience. Hard-boiled eggs last five to seven days refrigerated. Cut vegetables stay fresh three to four days in airtight containers. Most baked goods last three to five days at room temperature or longer frozen. Some sandwiches (peanut butter and jelly, deli meat and cheese without vegetables) freeze well for up to one month—pack frozen and they thaw by lunchtime. Avoid preparing lettuce-based salads or sandwiches with mayonnaise more than one day ahead. For weekly meal prep, prepare dry components and proteins on Sunday, then assemble with fresh items each morning.
4. What are the best containers for school lunches?
The best containers depend on your child’s age and your priorities. For durability and sustainability, stainless steel containers resist staining and odors and last many years. For budget-conscious families, BPA-free plastic container sets offer variety and affordability. For picky eaters who want separated foods, bento boxes with built-in compartments work well. Choose containers with secure, leak-proof lids that your child can open independently. Ensure they fit properly in your lunch bag and are dishwasher safe for easy cleaning. Invest in various sizes to accommodate different foods and portion sizes. Test containers before school starts to ensure your child can manage them during short lunch periods.
5. How much food should I pack for school lunch?
Portion sizes vary by age, appetite, and activity level. Elementary-age children typically need two to three ounces of protein, one to two grain servings, one cup of fruit, one-half to one cup of vegetables, and one cup of dairy. Middle schoolers need larger portions—three to four ounces of protein and increased fruits and vegetables. High schoolers, especially athletes, may need adult-sized portions. Start with moderate amounts and adjust based on what returns uneaten or if your child reports hunger. Consider whether your child eats breakfast and after-school snacks, which affect lunch appetite. Pack slightly more variety in smaller portions rather than large amounts of fewer items for younger children.
6. Can I pack hot food for school lunch?
Yes, use a vacuum-insulated food thermos to keep foods hot for four to six hours. Preheat the thermos by filling it with boiling water for several minutes, then dump the water and immediately add piping hot food. Fill the thermos completely for better heat retention. Pack saucy foods like soups, chili, pasta with sauce, or stews, as liquids maintain temperature better than dry foods. Test your thermos with water to ensure it’s still hot after the duration your child waits before lunch. Ensure hot food isn’t dangerously scalding by lunchtime, especially for younger children. Good thermos options include macaroni and cheese, chicken noodle soup, leftover stir-fry, and spaghetti.
7. What if my child’s school is nut-free?
Many schools ban nuts due to severe allergy risks. Replace peanut butter and other nut products with sunflower seed butter or soy nut butter, which provide similar taste and protein. Other nut-free protein options include hummus, cream cheese, deli meat, cheese, eggs, yogurt, and beans. Read all packaged food labels carefully, as many products contain nuts or are processed in facilities with nuts. Check school policies about seeds, as some schools with severe allergy concerns also restrict sunflower seeds. Teach your child about food allergy safety and the importance of not sharing foods that might contain allergens. Focus on naturally nut-free whole foods like fruits, vegetables, grains, and dairy.
8. How do I prevent sandwiches from getting soggy?
Pack wet ingredients separately for your child to add at lunch, or use barrier layers between bread and wet ingredients. Place lettuce, cheese slices, or even peanut butter on both bread slices as barriers between bread and wet fillings like tomatoes or dressing. Choose dense breads like bagels, ciabatta, or wraps that resist sogginess better than soft sandwich bread. Lightly toast bread before making sandwiches to create a moisture barrier. Pat wet ingredients like sliced tomatoes with paper towels before adding to sandwiches. Pack condiments in small separate containers. For make-ahead sandwiches, avoid mayonnaise and fresh vegetables, focusing on drier fillings like peanut butter and jelly or plain meat and cheese.
9. What should I do if my child never eats their lunch?
Investigate the underlying cause by asking specific questions about timing, preferences, and school environment. Determine whether your child has adequate time to eat during their lunch period, as some schools allow only twenty minutes. Check if social distractions prevent eating or if anxiety or stress suppresses appetite. Simplify lunches to fewer, easier-to-eat items that don’t require extensive unwrapping or utensils. Always include at least one favorite food. Ensure breakfast isn’t too large or too close to lunch, which can reduce appetite. If the problem persists, consult with your child’s teacher for observations and consider whether underlying issues like bullying, learning difficulties, or sensory challenges are affecting eating. Some children graze better on multiple snacks rather than one large lunch.
10. Are expensive lunch boxes and containers worth the investment?
Quality lunch supplies are worth investing in for most families, as they last many years and make daily packing easier. A good insulated lunch bag with thick insulation keeps food safer and maintains temperatures reliably. Durable containers with secure lids prevent leaks, last multiple school years, and eliminate frustration from broken or warped containers. Proper thermoses expand your lunch options to include hot foods. However, start with moderate investments until you establish your system and know what works. You don’t need premium brands for effective lunch packing. Focus investment on the insulated bag and containers you’ll use daily, while choosing budget options for less-used items. Quality supplies typically pay for themselves within one school year through reduced food waste, fewer replacements, and stress reduction.
Tags: how to pack school lunch, school lunch ideas, pack healthy lunch for kids, school lunch packing tips, meal prep school lunches, healthy school lunch, how to make school lunches, packing lunches for school, prepare school lunch, pack lunch for kids, school lunchbox ideas, lunch box containers, bento box, food safety school lunch, balanced lunch nutrition, lunch packing system, meal prep containers, ice packs lunch, thermos food containers, picky eater lunch, nut-free lunch ideas, budget lunch ideas, waste-free lunch, how to pack school lunch the night before, how to keep school lunch cold without refrigeration, how to pack school lunch for picky eaters, how to pack healthy school lunch on a budget, what containers are best for school lunch, how long does packed lunch stay fresh, what should I pack for school lunch, how do you keep lunch fresh until lunchtime, what makes a balanced school lunch, how much food should I pack for school lunch, can I pack hot food for school lunch, what lunch boxes are best for kids, best lunch boxes for school, lunch containers for kids, insulated lunch bags, reusable lunch supplies, school lunch nutrition guidelines, food safety packed lunches, lunch ideas for different ages





Leave a Reply