
Introduction
You pack a beautiful, nutritious lunch. Your child opens their lunch box at school. By dismissal, you find the same untouched sandwich, browning apple slices, and unopened yogurt. Sound familiar?
The challenge isn’t just creating healthy school lunch ideas—it’s finding nutritious options your child will actually eat. According to the School Nutrition Association, approximately 30% of packed lunches return home partially or completely uneaten, representing wasted food, money, and the nutritional support growing children need.
This guide delivers 50 healthy school lunch ideas that balance proper nutrition with real-world palatability. You’ll find quick options for hectic mornings, solutions for picky eaters, budget-friendly choices, and accommodations for common allergies. Each category includes practical preparation tips and nutrition highlights to build your confidence in providing lunches that support your child’s growth, learning, and energy.
Whether you’re packing lunch for a kindergartener with developing taste preferences or a middle schooler influenced by peer choices, these ideas offer variety, nutrition, and the crucial element most lunch guides overlook: appeal to actual children.
What Makes a School Lunch Healthy (And Actually Eaten)
A truly healthy school lunch serves two masters: nutritional science and your child’s willingness to eat it.
The Nutritional Framework
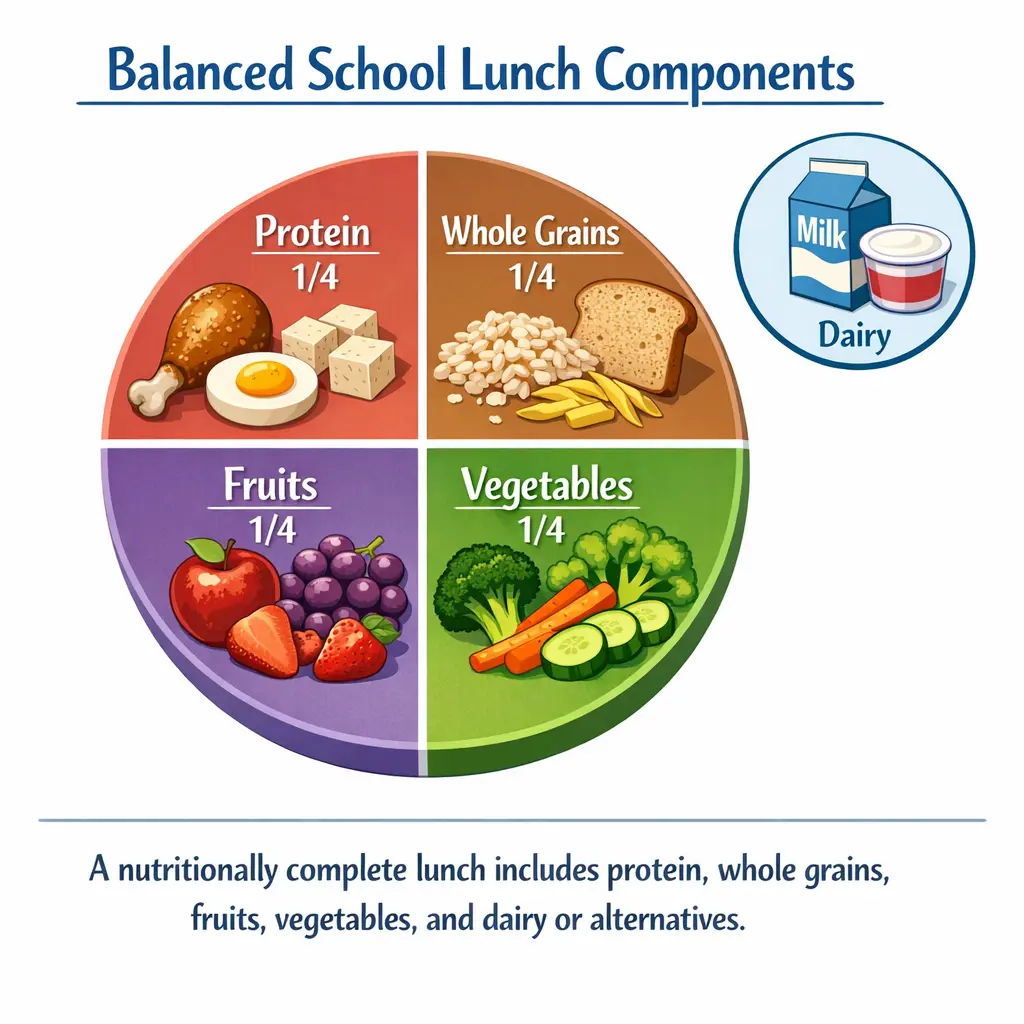
The USDA’s MyPlate guidelines recommend school lunches include:
Protein (1-2 ounces for elementary, 2-3 ounces for older students):
- Lean meats (turkey, chicken, lean beef)
- Eggs
- Beans and legumes
- Cheese and yogurt
- Nut or seed butters (if allowed)
Whole Grains (1-2 servings):
- Whole wheat bread, wraps, or pita
- Brown rice or quinoa
- Whole grain crackers or pretzels
- Oatmeal
Fruits (1-2 servings):
- Fresh whole fruits
- Cut fruit with minimal browning (use lemon juice)
- Dried fruit without added sugar
- Unsweetened applesauce
Vegetables (1-2 servings):
- Raw vegetables (carrots, cucumbers, bell peppers, cherry tomatoes)
- Roasted vegetables (cooled)
- Vegetable-based soups in thermoses
Dairy or Alternatives (1 serving):
- Milk (regular or shelf-stable)
- Cheese
- Yogurt
- Fortified non-dairy alternatives
The Palatability Factor
Nutrition means nothing if the lunch comes home uneaten. Research from the Journal of the Academy of Nutrition and Dietetics shows children are more likely to eat lunches that include:
- At least one familiar favorite item – Anchor new foods with something they already love
- Appropriate temperatures – Hot foods kept hot, cold foods kept cold
- Easy-to-eat formats – Foods matching their developmental abilities
- Appealing presentation – Colorful variety and interesting shapes
- Proper portion sizes – Not overwhelming, not insufficient
- Textural variety – Crunchy, soft, smooth, and chewy elements
Common Nutrition Misconceptions
Misconception: Every lunch must be perfectly balanced.
Reality: Balance nutrition over several days, not in every single lunch. One less-than-ideal lunch won’t harm development.
Misconception: Healthy means expensive specialty foods.
Reality: Eggs, beans, whole grain bread, seasonal produce, and plain yogurt provide excellent nutrition at low cost.
Misconception: Kids need entirely different food from adults.
Reality: Children and adults need the same nutrients, just in different portions. Family dinner leftovers often make excellent school lunches.
Professional Tip
Include your child in lunch planning appropriate to their age. Even young children can choose between two healthy options. This investment of five minutes increases lunch consumption significantly while teaching decision-making skills.
Food Safety Guidelines for Packed Lunches
Proper food safety protects your child from foodborne illness while ensuring lunch remains appealing.
The Critical Temperature Zone
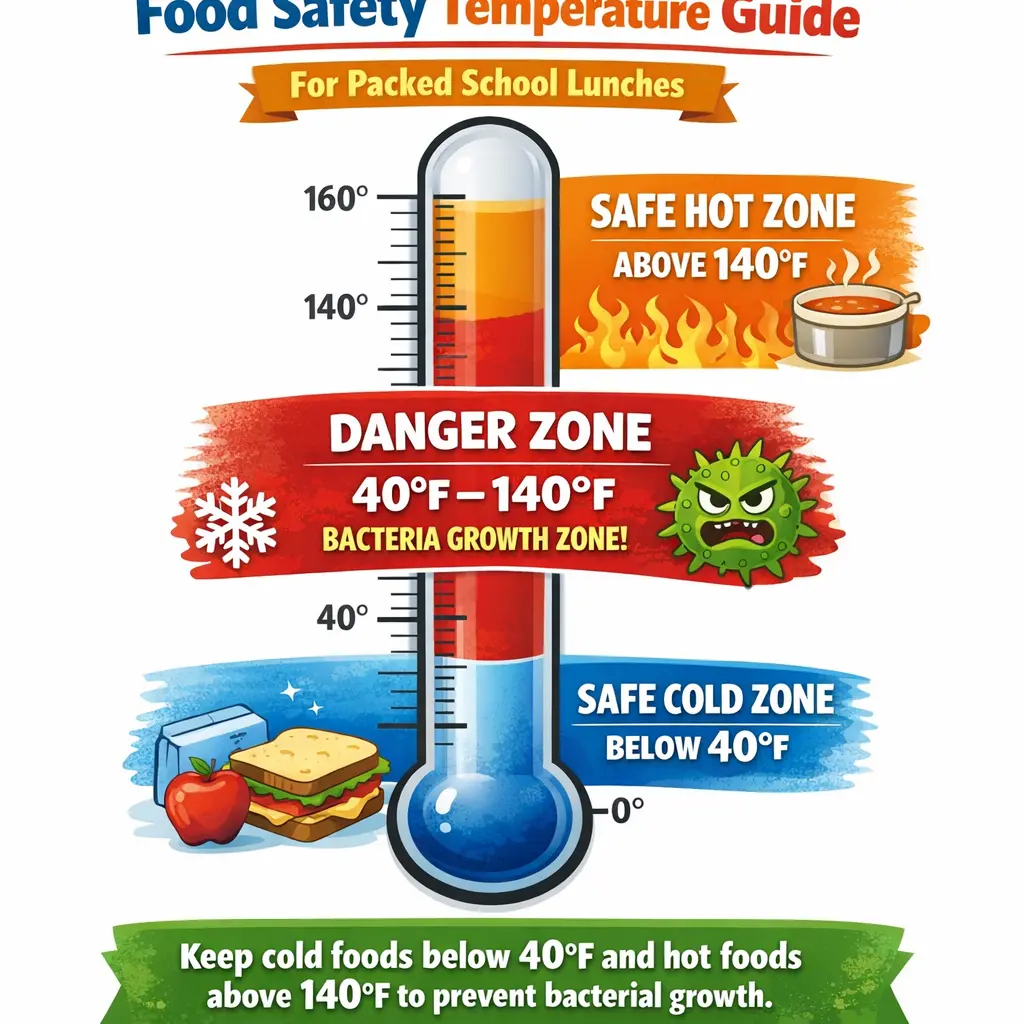
Bacteria multiply rapidly between 40°F and 140°F. The CDC recommends keeping cold foods below 40°F and hot foods above 140°F until eating time.
For Cold Lunches:
- Use at least two ice packs in insulated lunch bags
- Freeze juice boxes or water bottles to serve double duty as ice packs and drinks
- Pack lunch boxes directly from refrigerator to lunch bag
- Store lunch bags in coolest available location (not near windows or heaters)
For Hot Lunches:
- Preheat thermoses by filling with boiling water for 5 minutes
- Heat food above 165°F before packing
- Fill thermos immediately after heating
- Keep thermos sealed until eating
Safe Storage Times
Without refrigeration or ice packs:
- Maximum 2 hours for perishable items
- Room-temperature-safe foods (whole fruits, vegetables, crackers, sealed nut butters) last all day
With proper ice packs:
- Up to 4-5 hours for dairy, meat, cut fruits, and perishable items
- Confirm lunch box remains cold to touch
In thermos:
- Hot foods stay safe 4-5 hours if properly preheated
Foods That Travel Well
No refrigeration needed:
- Whole fruits (apples, oranges, bananas, grapes still on stem)
- Sturdy vegetables (whole carrots, bell pepper strips, sugar snap peas)
- Sealed individual nut butter packets
- Crackers, pretzels, popcorn
- Dried fruit
- Granola bars
- Shelf-stable milk boxes (until opened)
Require ice packs:
- Deli meat and cheese
- Yogurt and dairy
- Cut fruits
- Hummus and bean dips
- Cooked pasta or rice salads
- Hard-boiled eggs
Warning Signs
Teach children to avoid eating lunch if:
- Food smells unusual
- Dairy products feel warm
- Ice packs have completely thawed
- Meat or cheese appears slimy
- Lunch box was left in a hot location
Professional Tip
Label thermoses and containers with your child’s name and “opened on [date]” using removable tape. This helps staff identify lunches and prevents confusion in shared refrigerators.
50 Healthy School Lunch Ideas
Sandwich & Wrap Creations (Ideas 1-10)
Sandwiches remain popular because they’re portable, customizable, and familiar. These variations prevent boredom while delivering balanced nutrition.
1. Turkey and Cheese Pinwheels
Spread cream cheese on whole wheat tortilla, layer with turkey and cheese, roll tightly, and slice into 1-inch rounds. The spiral presentation appeals to young children, and the bite-sized format works for small hands.
Prep tip: Make several at once and refrigerate in airtight containers for grab-and-go mornings.
2. Hummus and Veggie Rainbow Wrap
Spread hummus on a whole wheat wrap, arrange colorful vegetable strips (red bell pepper, orange carrots, yellow bell pepper, cucumber), and roll. The crunch satisfies sensory preferences, while hummus provides protein and fiber.
Nutrition highlight: Chickpeas in hummus deliver protein, iron, and fiber—one serving provides about 6g protein.
3. Peanut Butter and Banana Roll-Up
(Nut-safe alternative: sunflower seed butter)
Spread peanut butter on whole wheat tortilla, place peeled banana on one edge, roll tightly, and slice. This portable format prevents the sogginess of traditional PB&B sandwiches.
Common mistake: Using too much peanut butter creates messiness. One tablespoon spreads adequately.
4. Chicken Salad Lettuce Wraps
Mix shredded rotisserie chicken with a small amount of mayo, diced grapes, and celery. Serve in crisp lettuce leaves with whole grain crackers on the side. This grain-free option works for gluten-sensitive children.
Professional tip: Pack lettuce and filling separately to prevent sogginess; children can assemble at lunch.
5. Cream Cheese and Cucumber Sandwiches
Spread cream cheese on whole wheat bread, layer with thin cucumber slices, and cut into fun shapes with cookie cutters. The mild flavor appeals to sensitive palates, and the cool crunch provides textural interest.
Age adaptation: Older children may enjoy additions like dill, tomato, or sprouts.
6. Egg Salad on Whole Grain Bread
Mash hard-boiled eggs with a small amount of mayo or Greek yogurt, add minced celery if accepted, and spread on whole grain bread. Eggs provide complete protein and essential choline for brain development.
Storage note: Egg salad requires proper refrigeration—use two ice packs and insulated bag.
7. Cheese Quesadilla Triangles
Sprinkle shredded cheese on half a whole wheat tortilla, fold over, cook until cheese melts, and cool before cutting into triangles. These travel well at room temperature and provide calcium and protein.
Variation: Add black beans, mild salsa, or finely diced bell peppers before cooking.
8. Sunflower Seed Butter and Apple Sandwich
Spread sunflower seed butter on whole grain bread, add thin apple slices, and close sandwich. The combination provides protein, healthy fats, and fiber while accommodating nut-free policies.
Browning prevention: Brush apple slices with lemon juice or pack apple slices separately for assembly at lunch.
9. Mozzarella and Tomato Basil Wrap
Layer fresh mozzarella, tomato slices, and fresh basil leaves on a whole wheat wrap with a light drizzle of olive oil. This introduces children to fresh, simple flavors.
Professional tip: Pack with ice pack and place tomatoes on paper towel to absorb excess moisture.
10. Tuna Salad Pocket
Mix tuna (packed in water) with Greek yogurt or light mayo, add diced celery and carrot, and stuff into whole wheat pita pocket. Tuna provides omega-3 fatty acids supporting brain health and development.
Packing strategy: Keep pita and filling separate to maintain texture; provide a small spoon for filling at lunchtime.
Nutrition Highlights for This Category:
Whole grain bread and wraps provide fiber and B vitamins. Varying proteins prevents monotony while ensuring adequate amino acid intake. Including vegetables increases vitamin, mineral, and fiber content.
Protein-Packed Bento Boxes (Ideas 11-20)
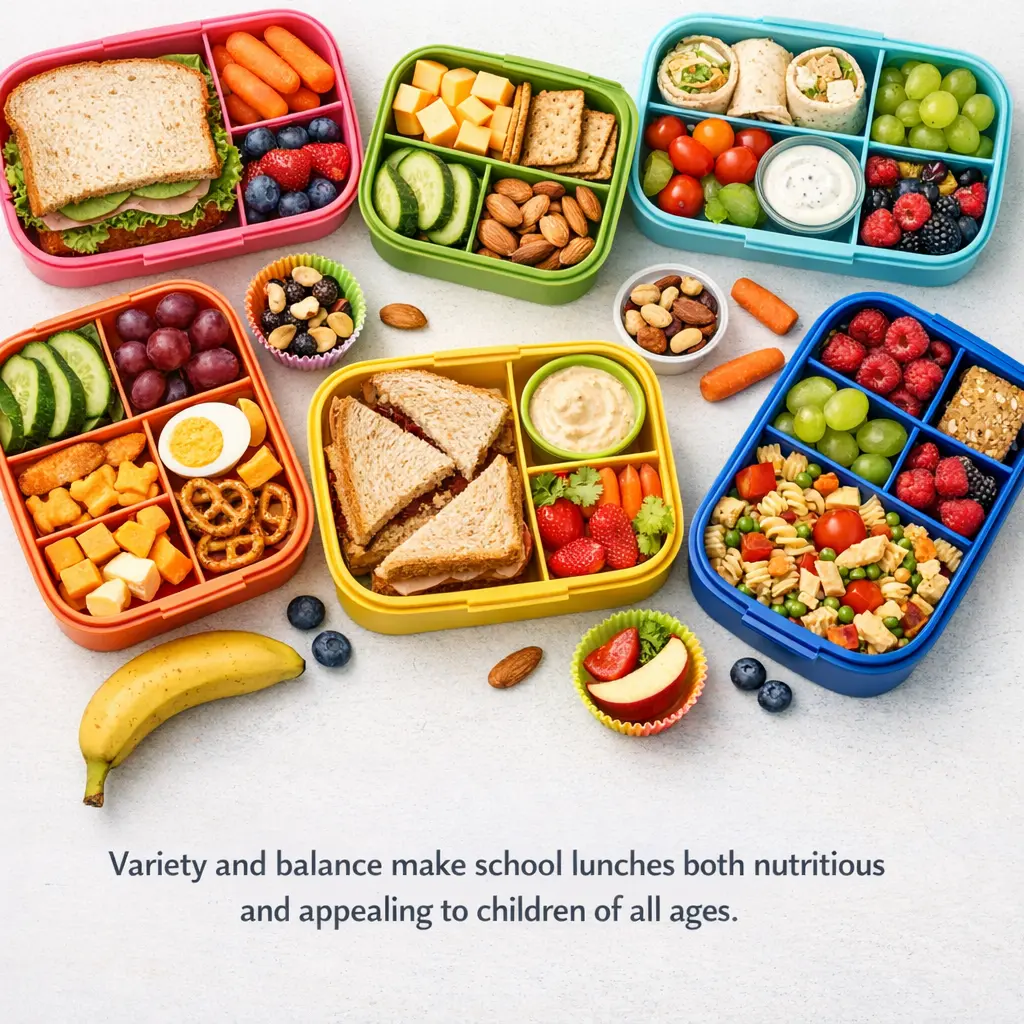
Bento-style lunches offer variety, appropriate portions, and visual appeal. The separated compartments prevent flavor mixing that some children dislike.
11. Classic DIY Lunchable
Whole grain crackers, sliced deli turkey or ham, cheese cubes, and apple slices. This mimics commercial versions while controlling sodium and additives.
Budget tip: Buying block cheese and slicing it yourself saves money compared to pre-cut cubes.
12. Greek Yogurt Protein Bowl
Plain Greek yogurt, granola, mixed berries, and a drizzle of honey. Greek yogurt contains twice the protein of regular yogurt—approximately 15-20g per serving.
Packing method: Pack yogurt and toppings in separate containers; children mix at lunch to prevent sogginess.
13. Hard-Boiled Egg Snack Plate
Hard-boiled eggs (whole or halved), whole grain crackers, cherry tomatoes, and cucumber slices. This simple combination provides complete protein and satisfying crunch.
Preparation strategy: Boil a dozen eggs on Sunday for the week. Store in shells and peel the night before packing.
14. Cheese and Fruit Kabobs
Thread cheese cubes and grapes onto short skewers. The presentation makes ordinary foods exciting for young children.
Safety consideration: Use rounded child-safe picks for younger students; remove sharp skewers for elementary ages.
15. Nut-Free Trail Mix Box
Sunflower seeds, dried cranberries, mini pretzels, and dark chocolate chips in small portions. This provides energy through healthy fats, protein, and whole grains.
Portion awareness: Trail mix is calorie-dense; use 1/4 to 1/2 cup portions for children.
16. Edamame and Rice Crackers
Steamed edamame (shelled for younger children), whole grain rice crackers, and orange slices. Edamame delivers plant-based complete protein with all essential amino acids.
Professional tip: Lightly salt edamame and pack in insulated container with ice pack.
17. Mini Bagel Pizza Bites
Whole wheat mini bagels topped with pizza sauce and mozzarella, toasted until cheese melts, then cooled. These travel well at room temperature and feel like a treat.
Variation: Add vegetables like diced bell peppers or mushrooms before toasting.
18. Chickpea Salad Box
Chickpeas tossed with diced cucumber, tomato, feta cheese, and light vinaigrette, served with whole grain pita chips. This Mediterranean-inspired option provides fiber and plant protein.
Texture tip: Drain and pat chickpeas dry to prevent sogginess.
19. Cottage Cheese and Fruit Parfait
Cottage cheese layered with pineapple chunks or peaches and a sprinkle of granola. Cottage cheese provides 14g protein per half-cup serving.
Acceptance strategy: Start with small-curd cottage cheese for better texture acceptance.
20. Salami, Cheese, and Olive Bento
Sliced salami, cheese cubes, olives, and whole grain crackers. This introduces children to simple charcuterie flavors.
Sodium awareness: Choose lower-sodium salami and limit processed meats to occasional lunches.
Nutrition Highlights for This Category:
Bento boxes naturally encourage balanced eating by presenting multiple food groups in appropriate portions. The variety addresses potential deficiencies by increasing the likelihood that at least several items will be consumed.
Hot Lunch Thermos Ideas (Ideas 21-25)
Thermoses maintain food temperature for 4-5 hours when properly preheated. Hot lunches provide comfort, especially during colder months.
21. Chicken Noodle Soup
Homemade or low-sodium canned chicken noodle soup with added vegetables. Warm liquids feel soothing and familiar, and soup provides hydration along with nutrition.
Thermos prep: Fill thermos with boiling water, let sit 5 minutes, empty, then immediately fill with piping hot soup.
22. Mac and Cheese with Hidden Veggies
Whole grain pasta with cheese sauce blended with pureed butternut squash or cauliflower. The orange color mimics traditional mac and cheese while boosting nutrition.
Texture preservation: Slightly undercook pasta; it continues softening in thermos.
23. Beef and Bean Chili
Mild chili with ground beef, beans, tomatoes, and minimal spices. Serve with cheese and crackers on the side. Beans and beef together provide complete protein and substantial fiber.
Spice adjustment: Keep chili mild for most children; offer hot sauce packets for adventurous eaters.
24. Alphabet Soup
Vegetable-based alphabet soup appeals to younger children through playful format while delivering vegetables they might otherwise refuse.
Engagement tip: Challenge children to find all 26 letters or spell their name.
25. Spaghetti and Meatballs
Whole grain spaghetti with mini meatballs and marinara sauce. This repurposes dinner leftovers effectively.
Packing strategy: Cut spaghetti into shorter lengths before packing for easier eating without utensils.
Nutrition Highlights for This Category:
Hot meals provide psychological comfort and increase vegetable acceptance (children consume more vegetables when cooked and warm). Thermoses enable using dinner leftovers, reducing food waste and morning preparation time.
Common Mistake to Avoid:
Never pack lukewarm food in a thermos. Food must be heated to 165°F or higher before packing to ensure safe temperatures until lunch.
Salad & Grain Bowl Options (Ideas 26-30)
Grain bowls and pasta salads work well for older elementary and middle school students with more developed eating skills.
26. Chicken Caesar Pasta Salad
Whole wheat pasta, grilled chicken, romaine lettuce, Parmesan cheese, and Caesar dressing packed separately. This provides the familiar Caesar flavor in portable format.
Freshness strategy: Pack lettuce and dressing separately; children can toss at lunchtime.
27. Quinoa and Black Bean Bowl
Cooked quinoa, black beans, corn, diced tomatoes, and shredded cheese with lime vinaigrette. Quinoa provides complete protein—rare in plant foods.
Make-ahead efficiency: Prepare grain bowl base on Sunday; portion into containers for the week.
28. Asian Noodle Salad
Whole wheat noodles, shredded carrots, edamame, and sesame dressing with sesame seeds. This introduces diverse flavors while maintaining familiar noodle format.
Allergy note: Sesame is a top allergen; verify school policies before packing.
29. Mediterranean Couscous Salad
Whole wheat couscous, chickpeas, cucumber, tomatoes, feta cheese, and lemon dressing. This grain bowl works well at room temperature.
Professional tip: Add a small ice pack to keep vegetables crisp and cheese fresh.
30. Taco Salad in a Jar
Layer shredded cheese, seasoned ground beef or turkey, lettuce, tomatoes, and mild salsa in a jar. Children shake to mix at lunchtime.
Fun factor: The shake-to-mix format creates engagement and ensures even distribution of ingredients.
Nutrition Highlights for This Category:
Grain bowls offer complete nutrition in one container—whole grains, protein, vegetables, and healthy fats. They accommodate various dietary preferences easily through ingredient swaps.
Age Consideration:
These options work best for students grade 3 and up with coordination for mixing components and using utensils.
Breakfast-for-Lunch Ideas (Ideas 31-35)
Breakfast foods for lunch add variety and utilize familiar, accepted items in new contexts.
31. Yogurt Parfait
Vanilla Greek yogurt layered with granola, sliced strawberries, and blueberries. Pack in a jar or container with separated compartments.
Protein boost: Greek yogurt contains approximately 15g protein per serving, supporting sustained energy through afternoon classes.
32. Whole Grain Waffles with Peanut Butter
Whole grain frozen waffles (toasted and cooled) with peanut butter spread and banana slices on the side. This travels well at room temperature.
Nut-free version: Substitute sunflower seed butter or cream cheese.
33. Breakfast Burrito
Scrambled eggs, cheese, and mild salsa in a whole wheat tortilla. Can be eaten cold or at room temperature.
Make-ahead method: Prepare several burritos, wrap individually, and freeze. Grab one frozen in the morning; it thaws by lunch while keeping other items cool.
34. Overnight Oats
Rolled oats mixed with milk or yogurt, chia seeds, and fruit, refrigerated overnight. This requires no morning preparation and provides fiber and protein.
Flavor variations: Try peanut butter banana, apple cinnamon, or berry vanilla to prevent boredom.
35. Egg Muffin Cups
Baked eggs in muffin tins with cheese and vegetables, cooled and packed with fruit and crackers. These protein-rich portions are perfectly sized for children.
Batch cooking: Make a dozen on Sunday; refrigerate in airtight container and grab two daily.
Nutrition Highlights for This Category:
Breakfast foods often feature whole grains and protein—essential for sustained energy and focus during afternoon learning. The familiarity increases acceptance, especially for hesitant eaters.
Leftover Transformations (Ideas 36-40)
Repurposing dinner leftovers reduces food waste and morning stress while providing nutrition you already trust.
36. Pizza Quesadilla
Leftover pizza filling (sauce, cheese, toppings) inside a grilled tortilla. The familiar pizza flavor appears in new format.
Reheating note: Make fresh rather than reheating actual pizza, which becomes soggy.
37. Teriyaki Chicken and Rice
Leftover teriyaki chicken over brown rice with steamed broccoli. Pack in thermos for hot lunch or cold in regular container.
Flavor tip: Most children prefer mild teriyaki sauce without strong ginger or garlic notes.
38. Meatball Sub in a Jar
Leftover meatballs, marinara sauce, and mozzarella cheese layered in a jar, served with slider buns on the side. Children can make mini subs or eat components separately.
Temperature option: Pack in thermos for warm meal or in regular container with ice pack for cold version.
39. Fried Rice with Egg
Leftover rice stir-fried with scrambled egg, peas, carrots, and soy sauce. This one-dish meal provides protein, vegetables, and whole grains.
Vegetable acceptance: Diced vegetables mixed into rice are less noticeable than separated portions.
40. Pulled Pork or Chicken Sliders
Leftover shredded meat on small whole wheat rolls with mild barbecue sauce. The slider format provides appropriate portions and fun presentation.
Sauce consideration: Pack sauce separately for children who prefer dry sandwiches.
Nutrition Highlights for This Category:
Leftovers ensure you’re providing the same nutrition you serve at family meals. This strategy saves money, reduces food waste, and eliminates the false dichotomy between “kid food” and “family food.”
Professional Tip:
When cooking dinner, intentionally make extra protein and grains. Store in lunch-ready portions for effortless grab-and-go mornings.
Vegetarian & Plant-Based Lunches (Ideas 41-45)
These options support vegetarian families and increase plant-based variety for all children.
41. Hummus and Veggie Pita Pocket
Whole wheat pita stuffed with hummus, lettuce, tomato, cucumber, and shredded carrot. Chickpeas provide protein and fiber without animal products.
Texture preservation: Pack hummus in small container for stuffing at lunchtime.
42. Black Bean and Cheese Quesadilla
Mashed black beans mixed with shredded cheese in a whole wheat tortilla, grilled until crispy. This provides complete protein when beans and grains combine.
Protein content: One serving provides approximately 12-15g protein.
43. Peanut Butter Energy Balls
No-bake balls made from peanut butter, oats, honey, and mini chocolate chips. These provide protein, healthy fats, and whole grains in portable format.
Make-ahead efficiency: Prepare a large batch and freeze. Pack frozen; they thaw by lunchtime.
44. Veggie and Cheese Wrap
Cream cheese spread on tortilla with shredded lettuce, grated carrot, sliced cucumber, and cheese. The mild flavor appeals to cautious eaters.
Customization: Children can add preferred vegetables, increasing autonomy and acceptance.
45. Lentil Soup in Thermos
Mild lentil soup with vegetables and optional cheese on the side. Lentils provide 18g protein per cooked cup—comparable to meat.
Digestive consideration: Introduce lentils gradually if child is unaccustomed; sudden increases in fiber can cause discomfort.
Nutrition Highlights for This Category:
Plant-based proteins provide fiber (absent in animal proteins), supporting digestive health and satiety. These options also tend to be budget-friendly, as dried beans and lentils cost significantly less than meat.
Allergy-Friendly Options (Ideas 46-50)
These ideas accommodate common food allergies while maintaining nutrition and appeal.
46. Sunflower Seed Butter and Jelly Sandwich
(Nut-free)
Sunflower seed butter provides similar nutrition to peanut butter—protein, healthy fats, vitamin E—without triggering nut allergies. Use whole grain bread and low-sugar jelly.
Taste note: Sunflower seed butter has slightly different flavor; introduce at home before packing for school.
47. Turkey Roll-Ups with Dairy-Free Cheese
(Dairy-free)
Turkey slices rolled around dairy-free cheese and vegetable sticks. Many dairy-free cheeses now melt and taste similar to traditional cheese.
Label reading: Verify dairy-free cheese is also free of other allergens if needed.
48. Rice Paper Spring Rolls
(Gluten-free, nut-free, dairy-free)
Rice paper wrapped around cucumber, carrot, lettuce, and cooked shrimp or tofu with sweet chili sauce for dipping. These accommodate multiple allergies simultaneously.
Preparation note: These require some practice but become quick once familiar with technique.
49. Gluten-Free Pasta Salad
(Gluten-free)
Gluten-free pasta with cherry tomatoes, mozzarella, and Italian dressing. Modern gluten-free pastas have significantly improved texture and taste.
Brand matters: Try several brands to find one your child enjoys; they vary considerably.
50. Egg-Free Chickpea Salad Sandwich
(Egg-free, can be dairy-free)
Mashed chickpeas mixed with mayo (or vegan mayo), celery, and seasoning on gluten-free bread. This mimics egg salad texture and flavor without eggs.
Allergen awareness: This option works for egg and nut allergies but contains legumes; verify no chickpea allergy exists.
Nutrition Highlights for This Category:
Food allergies require creativity but don’t necessitate nutritional compromise. Each major allergen has substitutes providing equivalent nutrition. Working with a pediatric allergist or registered dietitian ensures adequate nutrient intake despite restrictions.
Professional Tip:
When managing allergies, focus on what your child CAN eat rather than restrictions. This positive framing reduces stress for both parents and children.
Age-Specific Lunch Strategies
Children’s needs, skills, and preferences change dramatically as they grow. Adapting lunch strategies to developmental stages increases success.
Kindergarten and Early Elementary (Ages 5-7)
Developmental Considerations:
- Still developing fine motor skills for utensils and packaging
- Limited time to eat (often 15-20 minutes including unpacking)
- Easily overwhelmed by new foods or complex choices
- Strong influence from peers’ lunches
- May struggle with complicated packaging
Effective Strategies:
Keep portions small and simple. Young children have walnut-sized stomachs and feel overwhelmed by large portions. Pack half sandwiches, small fruit portions, and modest snacks.
Choose easy-open packaging. Test packaging at home. If your child can’t open it independently, they may skip that item entirely or ask for help that isn’t available.
Include familiar anchor foods. When introducing new items, always include at least two well-loved foods to prevent anxiety about the entire lunch.
Use visual cues. Colorful containers, fun picks, and simple arrangements make lunch appealing to visual learners.
Pack finger foods. Items that don’t require utensils increase consumption when time is limited and coordination is developing.
Limit choices. Two or three simple items work better than elaborate bento boxes with many compartments.
Example Lunch:
- Half turkey and cheese sandwich on white whole wheat bread (familiar)
- Sliced strawberries (favorite)
- Cheese crackers (easy finger food)
- Milk box (easy opening)
Upper Elementary (Ages 8-10)
Developmental Considerations:
- Increasing independence and desire for autonomy
- Stronger peer awareness and comparison
- More developed taste preferences
- Better fine motor control
- Growing appetite from increased activity
Effective Strategies:
Involve children in planning. Create a lunch menu together on weekends, allowing choices within healthy parameters.
Increase portions gradually. Growing children need more calories and protein; monitor lunch return and adjust accordingly.
Introduce new foods strategically. This age shows more openness to trying new items when presented without pressure.
Pack “cool” lunches. Be aware of what peers are eating and find healthy versions of popular items.
Teach lunch safety. Explain ice pack purposes, safe storage, and identifying spoiled food.
Include preparation tasks. Children this age can help pack lunches, building skills and investment in eating what they helped create.
Example Lunch:
- Hummus and veggie wrap (child selected vegetables)
- Grapes and cheese cubes on picks
- Granola bar (peer-approved brand)
- Pretzels
- Water bottle
Middle School (Ages 11-14)
Developmental Considerations:
- Significant appetite increase from growth spurts and puberty
- Strong peer influence and social awareness
- Desire for independence and adult treatment
- May feel “too old” for cute presentations
- Increasing awareness of body image and nutrition information
Effective Strategies:
Pack larger portions. Adolescents need substantially more calories—pack hearty lunches with ample protein.
Offer autonomy. Allow students to pack their own lunches with guidance, building life skills.
Focus on convenience. Quick-to-eat items accommodate busy social lunch periods.
Respect changing preferences. What they loved last year may now seem “babyish”; adapt without judgment.
Provide accurate nutrition information. Teens appreciate understanding why certain foods benefit their growing bodies, athletic performance, or appearance.
Consider social aspects. Some students prefer lunches that don’t draw attention; others enjoy unique items.
Example Lunch:
- Large turkey and cheese sub on whole grain roll
- Apple and peanut butter
- String cheese
- Trail mix
- Chips (portion-controlled)
- Bottled water
Professional Tip
Reassess lunch strategies at the start of each school year. What worked in second grade may fail in third. Brief check-ins (“What did you eat today?” “What would you like to try?”) provide valuable feedback for adjustments.
Solutions for Picky Eaters
Picky eating affects approximately 20-50% of children at some point. These strategies address selective eating without creating power struggles.
Understanding Picky Eating
Picky eating typically stems from:
- Normal developmental stage (especially ages 2-5)
- Sensory sensitivities (texture, temperature, appearance)
- Desire for autonomy and control
- Fear of new foods (food neophobia)
- Previous negative experiences with certain foods
It’s rarely about defiance or “being difficult.”
Evidence-Based Strategies
The Division of Responsibility
Developed by registered dietitian Ellyn Satter, this framework establishes:
- Parents decide: What foods are offered, when meals occur, where eating happens
- Children decide: Whether to eat, how much to eat from what’s offered
This approach reduces pressure while maintaining appropriate boundaries.
Implementation for Lunches:
Pack lunches with 4-5 items including at least one or two accepted foods. Your child chooses what and how much to eat from those options.
Repeated Exposure Without Pressure
Research shows children may need 10-15 exposures to a new food before accepting it. Each lunch doesn’t need to be eaten—exposure itself has value.
Pack the rejected item consistently without comment or pressure. Eventually, many children try it when ready.
Bridge Foods Strategy
Introduce new foods sharing characteristics with accepted foods.
Examples:
- Child likes chicken nuggets → try fish sticks (similar breading and shape)
- Child likes grapes → try cherry tomatoes (similar size and shape)
- Child likes crackers → try pita chips (similar crunch)
Deconstructed Meals
Some children prefer ingredients separate rather than mixed.
Instead of: Sandwich
Try: Crackers, turkey slices, cheese slices, lettuce separately
Instead of: Mixed pasta salad
Try: Plain pasta, vegetables, and cheese in different compartments
Involvement and Ownership
Children show more willingness to try foods they helped select or prepare.
Involvement opportunities:
- Grocery shopping together
- Choosing between two healthy options
- Washing vegetables
- Spreading condiments
- Packing lunch boxes
- Arranging items in containers
Safe Food Inclusion
Always include at least one “safe food”—something your child reliably eats. This prevents hunger and anxiety.
The safe food provides security that makes trying new items less risky psychologically.
What NOT to Do
Avoid pressure, bribes, or rewards. “Take three bites of vegetables to get dessert” creates negative associations with vegetables and unhealthy relationships with treats.
Don’t make separate meals. Offer the same foods you provide the family, but don’t force consumption.
Avoid labeling the child. “You’re such a picky eater” becomes part of their identity, reinforcing the behavior.
Don’t give up too quickly. Repeated exposure requires patience over weeks or months.
When to Seek Professional Help
Consult a pediatrician or pediatric feeding therapist if your child:
- Eats fewer than 20 different foods
- Refuses entire food groups
- Has extreme reactions to new foods (gagging, vomiting, panic)
- Shows declining growth or weight loss
- Has medical conditions affecting eating
Professional Tip
Track what your child DOES eat rather than focusing on rejections. Many parents discover their “picky eater” actually consumes adequate variety when viewed over a week rather than a single day.
Common Mistake:
Expecting balanced nutrition at every meal. Aim for balance over several days. Monday’s all-beige lunch won’t harm development if Tuesday includes fruits and vegetables.
Budget-Friendly Lunch Planning
Healthy lunches don’t require expensive specialty items. Strategic planning creates nutritious lunches at minimal cost.
Cost-Saving Strategies
Buy in Bulk and Portion at Home
Instead of: Individual yogurt cups ($0.75-$1.00 each)
Try: Large yogurt container portioned into reusable containers ($0.25-$0.35 per serving)
Instead of: Pre-sliced deli meat ($8-$10 per pound)
Try: Rotisserie chicken or home-cooked meat ($5-$6 per pound)
Instead of: Individual cheese sticks ($0.50 each)
Try: Block cheese cut into portions ($0.15-$0.20 per serving)
Instead of: Single-serve hummus ($1.50 each)
Try: Large hummus container portioned ($0.30-$0.40 per serving)
Utilize Seasonal Produce
Seasonal fruits and vegetables cost 30-50% less than out-of-season options.
Fall: Apples, pears, grapes
Winter: Oranges, grapefruit, pomegranate
Spring: Strawberries, cherries
Summer: Berries, peaches, watermelon
Frozen vegetables and fruits offer year-round affordability and nutrition equal to fresh options.
Plan Around Sales and Loss Leaders
Grocery stores feature rotating sales to attract customers. Build lunch plans around discounted items.
Stock up when prices drop:
- Bread (freeze extra loaves)
- Cheese (freeze shredded cheese)
- Yogurt (check sell-by dates)
- Canned goods (beans, tuna, soup)
Use Store Brands
Generic store brands typically cost 20-40% less than name brands with equivalent nutrition and quality.
Blind taste tests often reveal children can’t distinguish between brands—the familiar packaging matters more than actual taste differences.
Batch Cooking and Leftovers
Intentionally cook extra dinner portions for lunch repurposing.
Sunday chicken dinner → Monday chicken salad sandwich → Tuesday chicken quesadilla → Wednesday chicken and rice soup
Cook once, eat multiple times dramatically reduces per-meal cost and preparation time.
Grow Simple Produce
Even without garden space, some produce grows easily in containers:
- Cherry tomatoes
- Lettuce
- Herbs
- Peppers
Children eat more vegetables they grew themselves, creating both cost savings and increased consumption.
Budget-Friendly Lunch Formula
Protein (choose one):
- Hard-boiled eggs ($0.20-$0.30 each)
- Peanut butter ($0.15 per serving)
- Beans ($0.25 per serving)
- Canned tuna ($0.75 per serving)
- Rotisserie chicken ($0.60-$0.80 per serving)
Whole Grain (choose one):
- Whole wheat bread ($0.20-$0.30 for two slices)
- Brown rice ($0.15 per serving)
- Whole grain pasta ($0.25 per serving)
- Oats ($0.10 per serving)
Fruit (choose one):
- Banana ($0.20-$0.30)
- Apple ($0.50-$0.75)
- Orange ($0.40-$0.60)
- Seasonal berries ($0.50-$1.00)
- Grapes ($0.40-$0.70)
Vegetable (choose one):
- Carrot sticks ($0.20-$0.30)
- Celery ($0.15-$0.25)
- Bell pepper strips ($0.40-$0.60)
- Cherry tomatoes ($0.50-$0.75)
- Cucumber slices ($0.25-$0.40)
Sample Budget Lunch ($2.00-$2.50 total):
- Peanut butter sandwich on whole wheat bread ($0.45)
- Banana ($0.25)
- Carrot sticks ($0.25)
- Homemade granola bar ($0.30)
- Milk box ($0.50)
What to Skip
Pre-packaged “lunch kits”: Cost $3-$5 but provide minimal nutrition and high sodium. Making your own version costs $1-$2 with better quality.
Individual packages: Single-serve packaging dramatically increases cost. Portion bulk items into reusable containers.
Trendy “superfoods”: Açai bowls, specialty nut butters, and premium organic items offer minimal nutritional advantage over affordable whole foods.
Professional Tip
Calculate cost per lunch for one week of your current lunches, then one week using budget strategies. Most families save $30-$60 per child monthly—$300-$700 annually—without sacrificing nutrition or appeal.
Meal Prep Strategies That Actually Work
Meal prep reduces morning stress and decision fatigue. These systems work for real families with limited time.
The Sunday Prep Session (60-90 minutes)
Designated prep time once weekly creates grab-and-go convenience all week.
Protein Preparation:
- Boil one dozen eggs (store in shells)
- Cook 2-3 pounds chicken breast (dice or shred)
- Brown 1-2 pounds ground meat for taco filling
- Make egg muffin cups in silicone molds
Produce Preparation:
- Wash and portion berries
- Cut vegetables into sticks (carrots, peppers, cucumbers)
- Divide grapes into small bags
- Cut melon into cubes
Snack Assembly:
- Make energy balls or granola bars
- Portion crackers, pretzels, and chips into small containers
- Portion trail mix
- Cut cheese into cubes
Storage Strategy:
Use clear containers so everyone sees what’s available. Label with dates to track freshness.
The Batch-Freezer Method
Prepare multiple lunches at once and freeze for future use.
Freezer-Friendly Options:
- Sandwiches (peanut butter, cheese, cooked meat—avoid lettuce, tomatoes, mayo)
- Breakfast burritos
- Muffins and quick breads
- Homemade granola bars
- Cooked rice portions
- Pasta without sauce
Freezing Process:
Wrap individually in plastic wrap, then place in freezer bags. Label with contents and date.
Usage:
Grab frozen lunch items in the morning. They thaw by lunchtime while keeping other items cool—dual purpose.
The Modular System
Prep components rather than complete lunches, then mix and match daily.
Protein Module:
- Container of diced chicken
- Hard-boiled eggs
- Sliced deli meat
- Hummus portions
Grain Module:
- Cooked pasta
- Cooked rice
- Bread slices
- Tortillas
Produce Module:
- Cut vegetables
- Washed fruits
- Small containers of dip
Assembly:
Each morning, grab one from each module, add a dairy and snack. Total assembly time: 2-3 minutes.
The Rotation Menu
Create a two-week rotating menu eliminating daily decisions.
Week 1 Monday: Turkey sandwich, grapes, carrots, crackers
Week 1 Tuesday: Yogurt parfait, banana, granola bar
Week 1 Wednesday: Hummus wrap, apple, pretzels
(Continue through Week 2)
After two weeks, repeat. Most children tolerate this repetition well; adults tire of it more than children do.
Advantage: Simplified shopping (same list every two weeks), no decision fatigue, ensured variety over time.
The Child-Involvement System
Older elementary and middle school students can participate, building life skills.
Age-Appropriate Tasks:
Ages 6-8:
- Placing items in lunch box from prepped containers
- Choosing between two healthy options
- Adding ice packs
Ages 9-11:
- Making sandwiches
- Portioning snacks
- Washing produce
- Packing complete lunches with supervision
Ages 12+:
- Full lunch packing responsibility with occasional check-ins
- Participating in grocery shopping
- Simple food preparation
Implementation:
Start with one task, demonstrate, supervise, then gradually release responsibility.
Morning Assembly Line
For families with multiple children, create an assembly line system.
Setup:
Arrange components on counter in order: proteins, grains, fruits, vegetables, snacks, drinks.
Process:
Move down the line, adding one item from each category to each lunch box.
Time savings: 5-7 minutes total for multiple lunches versus 3-4 minutes per lunch individually.
The Night-Before Method
For families who function better in evenings than mornings.
Evening routine (10 minutes):
- Pack lunches completely
- Store in refrigerator
- Add ice packs in morning
- Grab and go
Advantage: Calmer mornings without time pressure.
Consideration: Requires discipline to complete when tired after dinner.
Professional Tip
Choose ONE prep method that matches your family’s natural rhythms. The “best” system is the one you’ll actually use consistently, not the most elaborate or impressive version you saw online.
Common Mistake:
Trying to implement too many strategies simultaneously. Start with one change (like Sunday protein prep), master it, then add another element.
Essential Lunch Packing Supplies
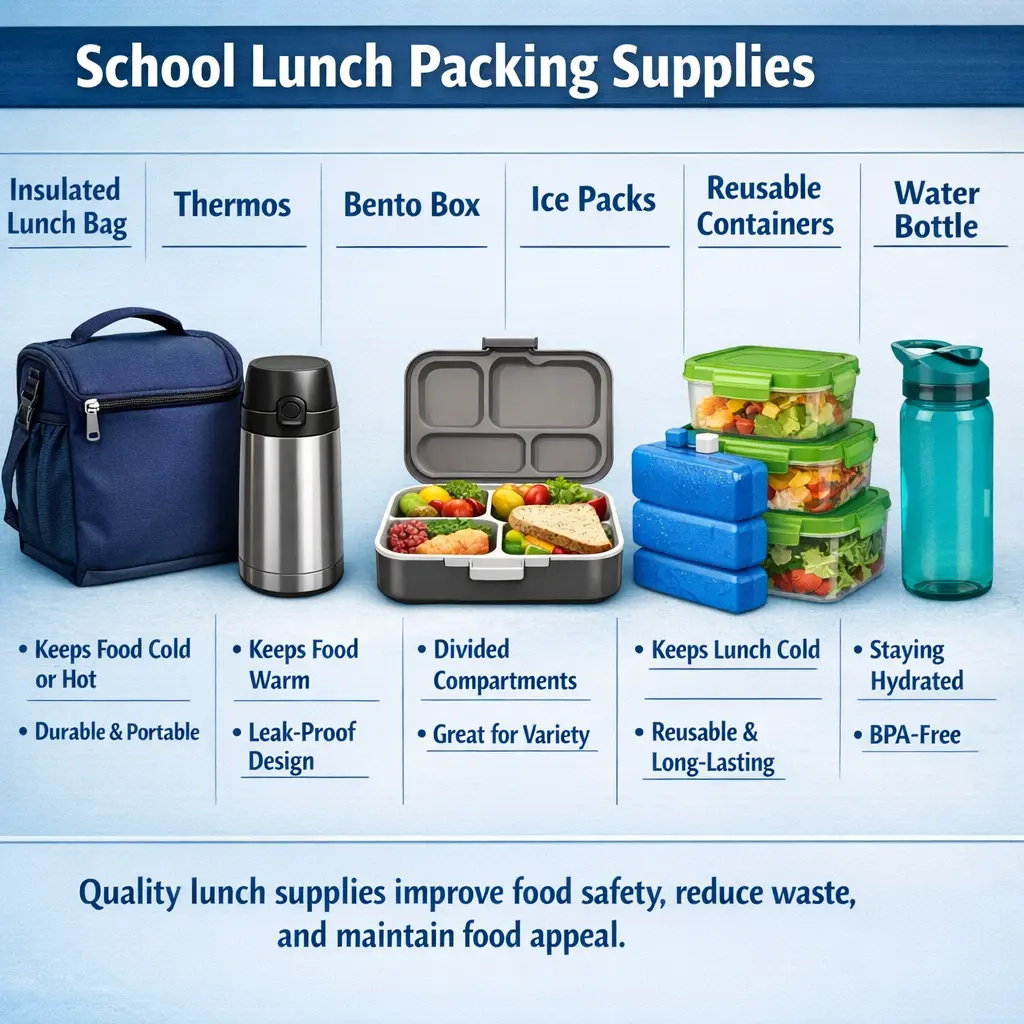
Proper equipment improves food safety, convenience, and appeal while reducing waste.
Investment Priority Guide
Tier 1: Essential (Purchase First)
Insulated Lunch Bag
- Maintains safe temperatures for perishable foods
- Look for: Easy-clean interior, sturdy zipper, comfortable handle
- Cost: $10-$25
- Lifespan: 2-3 years with proper care
Ice Packs (4-6 minimum)
- Keeps perishable items below 40°F
- Look for: Slim profile, freezes overnight, non-toxic gel
- Cost: $8-$15 for set
- Lifespan: Multiple years
Reusable Containers (variety of sizes)
- Reduces waste and cost versus disposable bags
- Look for: Leak-proof lids, dishwasher-safe, BPA-free
- Cost: $15-$30 for starter set
- Lifespan: Several years
Water Bottle
- Ensures hydration throughout school day
- Look for: Leak-proof, easy to open, fits lunch bag pocket
- Cost: $8-$20
- Lifespan: 1-2 years
Tier 2: Helpful Additions
Thermos or Food Jar
- Enables hot lunch options
- Look for: Stainless steel, wide mouth for easy cleaning, 10-16 oz for children
- Cost: $15-$30
- Lifespan: Many years with proper care
Bento Box
- Provides built-in portion control and variety
- Look for: Leak-proof compartments, microwave-safe if needed
- Cost: $15-$35
- Lifespan: 2-3 years
Silicone Muffin Cups
- Creates compartments in regular containers
- Look for: Food-grade silicone, dishwasher-safe
- Cost: $8-$12 for set
- Lifespan: Years
Small Containers for Dips and Dressings
- Keeps wet items separate to prevent sogginess
- Look for: 2-4 oz capacity, leak-proof lids
- Cost: $6-$12 for set
- Lifespan: 2-3 years
Tier 3: Nice to Have
Food-Safe Picks and Skewers
- Makes ordinary foods more appealing
- Look for: Rounded ends for safety, dishwasher-safe
- Cost: $5-$10 for set
Insulated Food Bag
- Extra insulation for field trips or longer days
- Cost: $10-$20
Sandwich Cutters
- Creates fun shapes from sandwiches
- Cost: $5-$12
Labels or Markers
- Identifies items in shared refrigerators
- Cost: $3-$8
Maintenance and Care
Daily:
- Empty lunch boxes immediately after school
- Wash containers, lids, and utensils
- Wipe lunch bag interior with damp cloth
- Air-dry lunch bag completely before closing
- Return ice packs to freezer immediately
Weekly:
- Deep clean lunch bag (most are machine washable or require hand washing)
- Inspect containers for cracks, warping, or worn seals
- Check thermos seal and threading
- Organize lunch packing area
Monthly:
- Inventory supplies and replace worn items
- Sanitize lunch boxes (dilute vinegar solution or dishwasher sanitize cycle)
- Purge unused or outgrown containers
Purchasing Strategy
Start basic. One good lunch box, a few containers, and ice packs cover most needs. Add specialized items as you identify specific requirements.
Buy quality over quantity. One durable thermos serving daily for years costs less than replacing cheap versions multiple times.
Check school policies. Some schools prohibit glass containers or have specific microwave requirements. Verify before purchasing.
Involve children in selection. Choosing their lunch box increases excitement and ownership. Set parameters (insulated, appropriate size, within budget) and let them select pattern or color.
Budget-Friendly Alternatives
Reuse single-use containers. Clean yogurt cups, applesauce containers, and deli containers work for portioning until you acquire full set of reusables.
Check discount stores. Many budget retailers carry adequate lunch supplies at lower prices.
End-of-season sales. Purchase next year’s lunch supplies when stores clear inventory in spring.
Hand-me-downs. Thermoses and lunch boxes often outlive children’s interest in designs. Swap with friends or check secondhand stores.
Professional Tip
Create a dedicated lunch packing station at home with all supplies in one location. This eliminates morning searching and reduces preparation time significantly.
Common School Lunch Mistakes to Avoid
Even well-intentioned parents make these errors that reduce lunch consumption and nutrition.
Mistake 1: Packing Too Much Food
The problem: Overwhelming portions create decision paralysis and waste. Children feel pressure to finish everything or guilt about waste.
The solution: Pack appropriate portions for your child’s age and appetite. It’s better to pack slightly less and have them request more than consistently discard excess.
Age-appropriate portions:
- Ages 5-7: Half sandwich, small fruit, small vegetable portion, one snack
- Ages 8-11: Full sandwich or equivalent, medium fruit, vegetable portion, 1-2 snacks
- Ages 12+: Larger sandwich or protein, larger portions, 2-3 snacks
Mistake 2: Introducing New Foods Without Testing
The problem: Packing unfamiliar items for school lunch often results in rejection and hunger.
The solution: Test new foods at home first, ideally multiple times. Serve at dinner or weekend lunch where you can observe reactions and answer questions.
Implementation: Once accepted at home, include new item in lunch alongside familiar favorites.
Mistake 3: Prioritizing Nutrition Over Palatability
The problem: The healthiest lunch provides zero nutrition if uneaten.
The solution: Find the balance between ideal nutrition and realistic consumption. Slightly less nutritious food that’s eaten beats perfect nutrition that’s discarded.
Practical approach: If your child consistently refuses whole wheat bread, try white whole wheat (milder flavor, similar nutrition) or occasionally use regular bread to ensure sandwich consumption.
Mistake 4: Improper Temperature Management
The problem: Warm yogurt, lukewarm thermoses, and thawed frozen items create food safety risks and reduced appeal.
The solution:
- Use adequate ice packs (2 minimum for standard lunch)
- Preheat thermoses properly (5 minutes with boiling water)
- Pack lunch directly from refrigerator to insulated bag
- Store in coolest available location
Test at home: Pack a lunch and monitor temperature after 4 hours to verify safety.
Mistake 5: Complicated Packaging
The problem: Children with limited time struggle with difficult containers, twist ties, or elaborate wrapping, leading to skipped items.
The solution: Test packaging at home. If your child can’t open it independently in 10 seconds, simplify.
Examples:
- Use containers with easy-flip lids instead of twist-top
- Skip twist ties on bags; use fold-over method
- Avoid packages requiring scissors or tools
- Choose boxes with simple clasps
Mistake 6: Ignoring Lunch Timing
The problem: Packing bananas that brown, apples that oxidize, or sandwiches that become soggy ignores the 4-6 hour gap between packing and eating.
The solution:
- Choose fruits that hold up (whole apples, oranges, grapes on stem)
- Treat cut apples with lemon juice
- Pack wet ingredients separately from bread
- Use lettuce as barrier between moist fillings and bread
- Skip highly perishable items without adequate cooling
Mistake 7: Creating Lunch in Isolation from Other Meals
The problem: Planning lunch without considering breakfast or dinner may create nutritional gaps or excessive repetition.
The solution: View all daily meals collectively. If breakfast included dairy and fruit, lunch might emphasize vegetables and protein.
Weekly perspective: Balance nutrition over several days rather than stressing over each individual lunch.
Mistake 8: Not Asking for Feedback
The problem: Assuming children will communicate issues without prompting means problems persist unaddressed.
The solution: Regular, specific questions provide valuable information:
- “What did you eat today?”
- “What didn’t you eat? Why?”
- “Did you have enough time to eat everything?”
- “What would you like to try for lunch?”
- “Was anything too warm/cold/soggy?”
Avoid: “How was lunch?” (Too vague to be useful)
Mistake 9: Comparison and Pressure
The problem: Commenting on other children’s lunches or expressing disappointment about uneaten items creates shame and resistance.
The solution: Maintain neutral tone about lunch contents. “I see you didn’t eat the carrots. Would you prefer cucumbers next time?” versus “You never eat the vegetables I pack!”
Remember: Food relationships develop over time. Pressure creates opposition.
Mistake 10: Rigid Adherence to “Healthy” Rules
The problem: Refusing any treat or processed food can create forbidden fruit syndrome and social isolation.
The solution: Occasional treats as part of overall balanced nutrition don’t undermine health. Including a small cookie or chips periodically demonstrates balanced approach.
The 90/10 principle: If 90% of diet consists of whole, nutritious foods, 10% flexibility for treats fits into healthy eating patterns.
Professional Tip
When lunch repeatedly comes home uneaten, resist the urge to pack entirely different items the next day. Make one small change at a time to identify the actual issue (portion size? specific food? packaging? temperature? time constraints?).
1. How do I keep lunch cold without access to refrigeration?
Use an insulated lunch bag with at least two ice packs—one on the bottom and one on top of the lunch items. Pack the lunch directly from the refrigerator into the insulated bag. Freeze juice boxes or water bottles to serve double duty as both ice packs and drinks. Choose an insulated lunch bag with thick walls rather than thin fabric bags. When packed properly, lunch stays below 40°F for 4-5 hours. You can test this at home using a food thermometer placed in yogurt or another perishable item. For maximum cooling, store the packed lunch in the refrigerator until leaving for school, and instruct children to keep lunch bags away from warm locations like windows or heaters.
2. What should I pack for a child with multiple food allergies?
Focus on whole foods that naturally avoid common allergens. Safe proteins include cooked chicken, turkey, beans, lentils, and seeds (if permitted). Grains like rice, quinoa, and allergen-free breads provide energy. Fresh fruits and vegetables rarely trigger allergies. Read all labels carefully, as allergens hide in unexpected places—for example, some deli meats contain milk proteins, and cross-contamination occurs in manufacturing facilities. Connect with your child’s school to understand their policies and available accommodations. Work with a pediatric allergist or registered dietitian to ensure adequate nutrition despite restrictions. Many companies now produce allergen-friendly versions of popular foods. Join food allergy support groups for families to share safe recipes and product recommendations.
3. My child says they don’t have enough time to eat lunch. What can I do?
First, verify the actual lunch period length with the school—sometimes children’s perception differs from reality. If lunch periods are genuinely short (15-20 minutes including unpacking), adjust your packing strategy. Choose foods that don’t require extensive unwrapping or assembly. Pack items that can be eaten with hands rather than requiring utensils and cutting. Skip items like oranges that require significant peeling time. Pre-cut sandwiches into quarters for faster eating. Place the most nutritionally important items at the top of the lunch box so they’re eaten first if time runs out. Consider packing two smaller snacks instead of one large lunch if your child has both a lunch period and separate snack time. Some children spend lunch time socializing rather than eating; this is developmentally normal but may require conversations about balancing social time with adequate nutrition.
4. How can I pack healthy lunches on a tight budget?
Buy versatile staples in bulk: dried beans, rice, pasta, oats, peanut butter, eggs, and block cheese. These provide excellent nutrition at low cost. Shop seasonal produce when prices drop significantly. Frozen vegetables and fruits offer nutrition equal to fresh at lower prices year-round. Use store brands rather than name brands—blind taste tests show most children can’t tell the difference. Repurpose dinner leftovers instead of cooking separately for lunches. Make your own versions of expensive convenience items: homemade granola bars cost about one-third the price of purchased versions. Pack bulk items into reusable containers instead of buying individually wrapped portions. Calculate cost per serving rather than package price to identify true value. A whole rotisserie chicken ($5-7) provides multiple lunches at lower cost per serving than deli meat. Growing simple produce like cherry tomatoes or lettuce, even in small containers, reduces costs while engaging children.
5. What are the best lunch options for picky eaters?
Always include at least one “safe food”—something your child reliably eats. This prevents hunger and reduces anxiety about lunch. Introduce new foods alongside familiar items rather than replacing everything at once. Try “bridge foods” that share characteristics with accepted items: if your child likes crackers, try pita chips; if they eat chicken nuggets, try fish sticks. Deconstruct mixed foods into separated components—some children prefer ingredients separate rather than combined. Involve your child in lunch planning and preparation, which increases willingness to try new items. Offer the same new food repeatedly without pressure; research shows children often need 10-15 exposures before accepting a food. Keep presentation simple rather than elaborate, which can overwhelm cautious eaters. Respect genuine preferences while gently encouraging variety. Some children have sensory processing differences that make certain textures genuinely aversive, not just “picky.” Focus on adding new foods rather than removing accepted ones.
6. Can I pack leftovers from dinner for school lunch?
Absolutely—leftovers make excellent school lunches and reduce both food waste and preparation time. Many dinner foods work well cold: pasta salad, chicken and rice, quesadillas, pizza (cut into easy portions), meatballs, and grain bowls. Some leftovers work better reheated and packed in a thermos: soups, chili, pasta with sauce, and stir-fries. When cooking dinner, intentionally make extra portions specifically for lunches. Store in lunch-ready portions rather than one large container for easier morning packing. Some foods don’t travel well: anything with cream sauce that separates, delicate fish, or foods that become soggy. Test at home before sending to school. Refrigerate leftovers within two hours of cooking and use within 3-4 days. Reheat to 165°F before packing in thermos. Repurposing leftovers also exposes children to a wider variety of foods than typical “kid lunch” options, expanding their palates gradually.
7. How do I pack a hot lunch that stays warm until lunchtime?
Invest in a quality stainless steel thermos with a wide mouth for easier eating and cleaning. Preheat the thermos by filling it with boiling water and letting it sit for 5 minutes while you heat the food. Pour out the hot water, then immediately fill with food heated to at least 165°F or hotter. Seal tightly. A properly preheated thermos keeps food above 140°F for 4-5 hours. Hot, thick foods (chili, pasta, oatmeal) retain heat better than brothy soups. Fill the thermos as full as possible—less air space means better heat retention. Don’t open the thermos until eating time, as this releases heat. Include a note reminding younger children not to open until lunch. Test your thermos at home: pack hot food, wait 4-5 hours, then check temperature. If it’s not adequately warm, you may need a better quality thermos. Some thermoses come with folding spoons stored in the lid for convenience.
8. What foods don’t need refrigeration and are still healthy?
Many nutritious foods remain safe at room temperature for 4-6 hours. Whole fruits like apples, oranges, bananas, and grapes on the stem don’t require cooling. Vegetables with sturdy texture—whole carrots, celery sticks, bell pepper strips, and sugar snap peas—stay fresh without refrigeration. Sealed individual nut butter packets, crackers, pretzels, whole grain bread, dried fruit without added sugar, nuts and seeds (if permitted), granola bars, and popcorn are shelf-stable. Shelf-stable milk boxes and juice boxes don’t need refrigeration until opened. Honey, jam, and jelly are shelf-stable. Hard cheese in wax coating can go several hours without cooling, though most cheese benefits from ice packs. Trail mix combining nuts, seeds, dried fruit, and chocolate chips provides energy and nutrition without cooling needs. These options work well for schools without lunch refrigeration or for active children who keep lunches in lockers or backpacks all morning.
9. How much lunch should I pack for my child?
Portion sizes depend on age, activity level, and individual appetite. General guidelines suggest lunch should provide about one-third of daily calories and nutrients. For ages 5-7, pack smaller portions: half sandwich or equivalent, one small fruit, small vegetable portion, one snack, and a drink. For ages 8-11, increase to a full sandwich or equivalent, medium fruit, vegetable portion, 1-2 snacks, and drink. For ages 12 and up, pack more substantial portions to fuel growth and increased activity: larger protein portions, ample fruits and vegetables, 2-3 snacks, and drink. However, these are guidelines, not rules. Monitor what comes home uneaten. If your child consistently returns half the lunch, reduce portions. If they report hunger in the afternoon, increase amounts. Some children eat lighter lunches and prefer larger breakfasts or after-school snacks. Growth spurts dramatically increase appetite temporarily. Ask your child directly about whether portions feel appropriate.
10. Should I pack lunch the night before or the morning of school?
Either approach works—choose based on your family’s natural rhythms. Packing the night before creates calmer mornings and ensures forgotten lunches are less likely. If you choose this method, pack everything except ice packs, which get added in the morning. Store packed lunches in the refrigerator overnight. This works well for organized evening people who struggle with morning time pressure. Morning packing works better for families who function well with morning routines. It allows including breakfast leftovers (extra eggs, remaining fruit) and ensures maximum freshness. Some families use a hybrid approach: prep components on Sunday (cut vegetables, portion snacks, cook proteins), then quickly assemble each morning. The “best” approach is the one you’ll do consistently. A lunch packed consistently one way beats the theoretically “better” method you’ll abandon after a week. Some foods pack better fresh (sandwiches with lettuce, cut fruits), while others don’t matter (crackers, cheese, vegetables). Experiment to find your family’s preference.




Leave a Reply